User Interface
The user interface for Engine Driver is described and explained in these pages as ‘screens’. There are several ‘Main Screens’ which you will routinely interact with and and larger number of ‘Secondary / Support Screens’ that will interact with infrequently.
There are also some settings that impact all of the screens which described towards the end of this page:
Theme
Localisation
Main Screens
There are four main screens:
Connection Screen
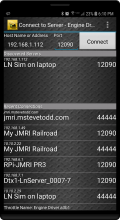
This screen is the first screen you normally see when starting Engine Driver.
It allows you choose which WiThrottle Server to connect to, which you must do to control your trains.
There are three ways you can select a WiThrottle Server to connect to:
IP Address and Port
Discovered Servers
Recent servers
Once you select a server the Throttle Screen will be automatically displayed.
If you only ever connect to one WiThrottle Server you can effectively bypass this screen by enabling the Auto-Connect to WiThrottle Server? preference.
Note
See WiFi Issues for more assistance with connection difficulties.
Connection Method Options
IP Address and Port
Enter the IP address or URI of the server in the first field, and the port in the second field, then click Connect. Engine Driver will attempt to connect to it, and the Throttle Screen will be displayed.
Discovered Servers
This is the most common way to connect.
Your WiThrottle Server will attempt to broadcast its details so that apps like Engine Driver can automatically find it. If Engine Driver does find it, it will be listed here.
To connect to any WiThrottle Server in this list, simply click on the row. Engine Driver will attempt to connect to it, and the Throttle Screen will be displayed.
Recent servers
To connect to any WiThrottle Server in this list, simply click on the row. Engine Driver will attempt to connect to it. If successful the Throttle Screen will be displayed.
Note that, just because it is in this list, it does not mean that you can connect to it now. It only means that you have successfully connected to it in the past.
Action Bar (Connection Screen)
The Action Bar appears at the top of all screens. It will show different information and different buttons depending on a) the particular screen and b) preferences you have set.
In the Connection Screen the Action Bar only displays:
The app name (Engine Driver)
See the Action Bar section of this page for more information.
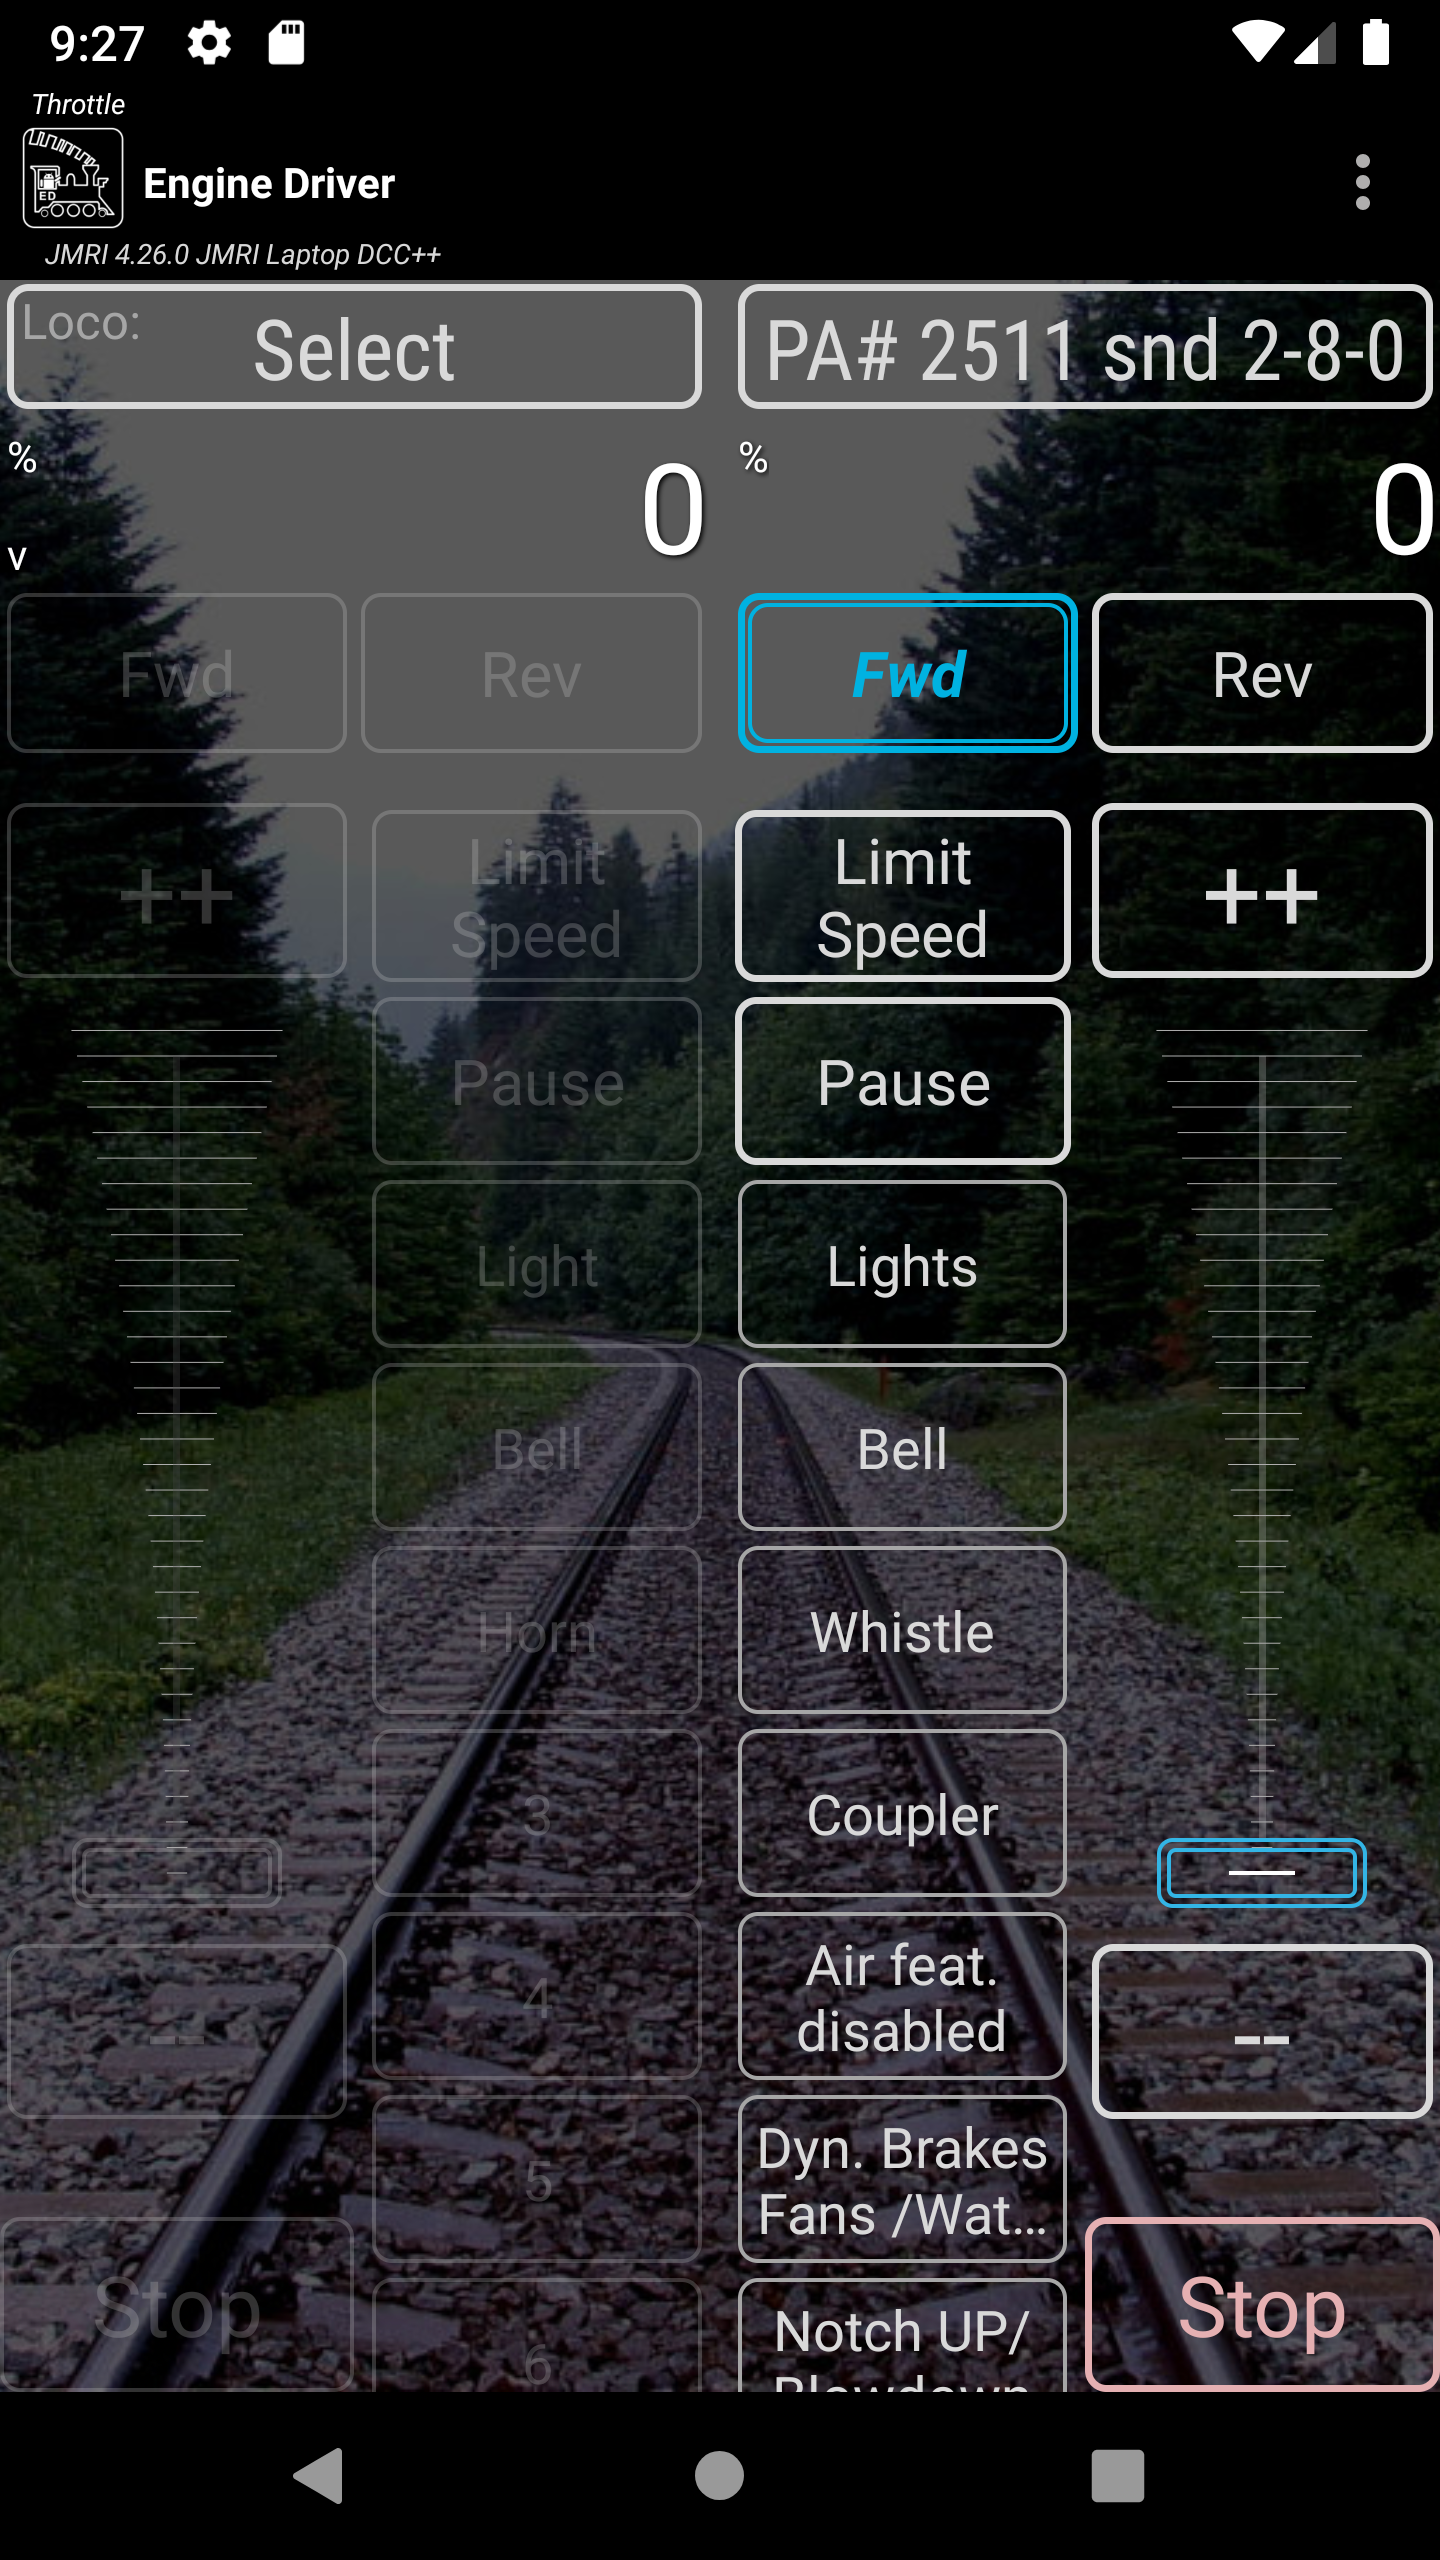
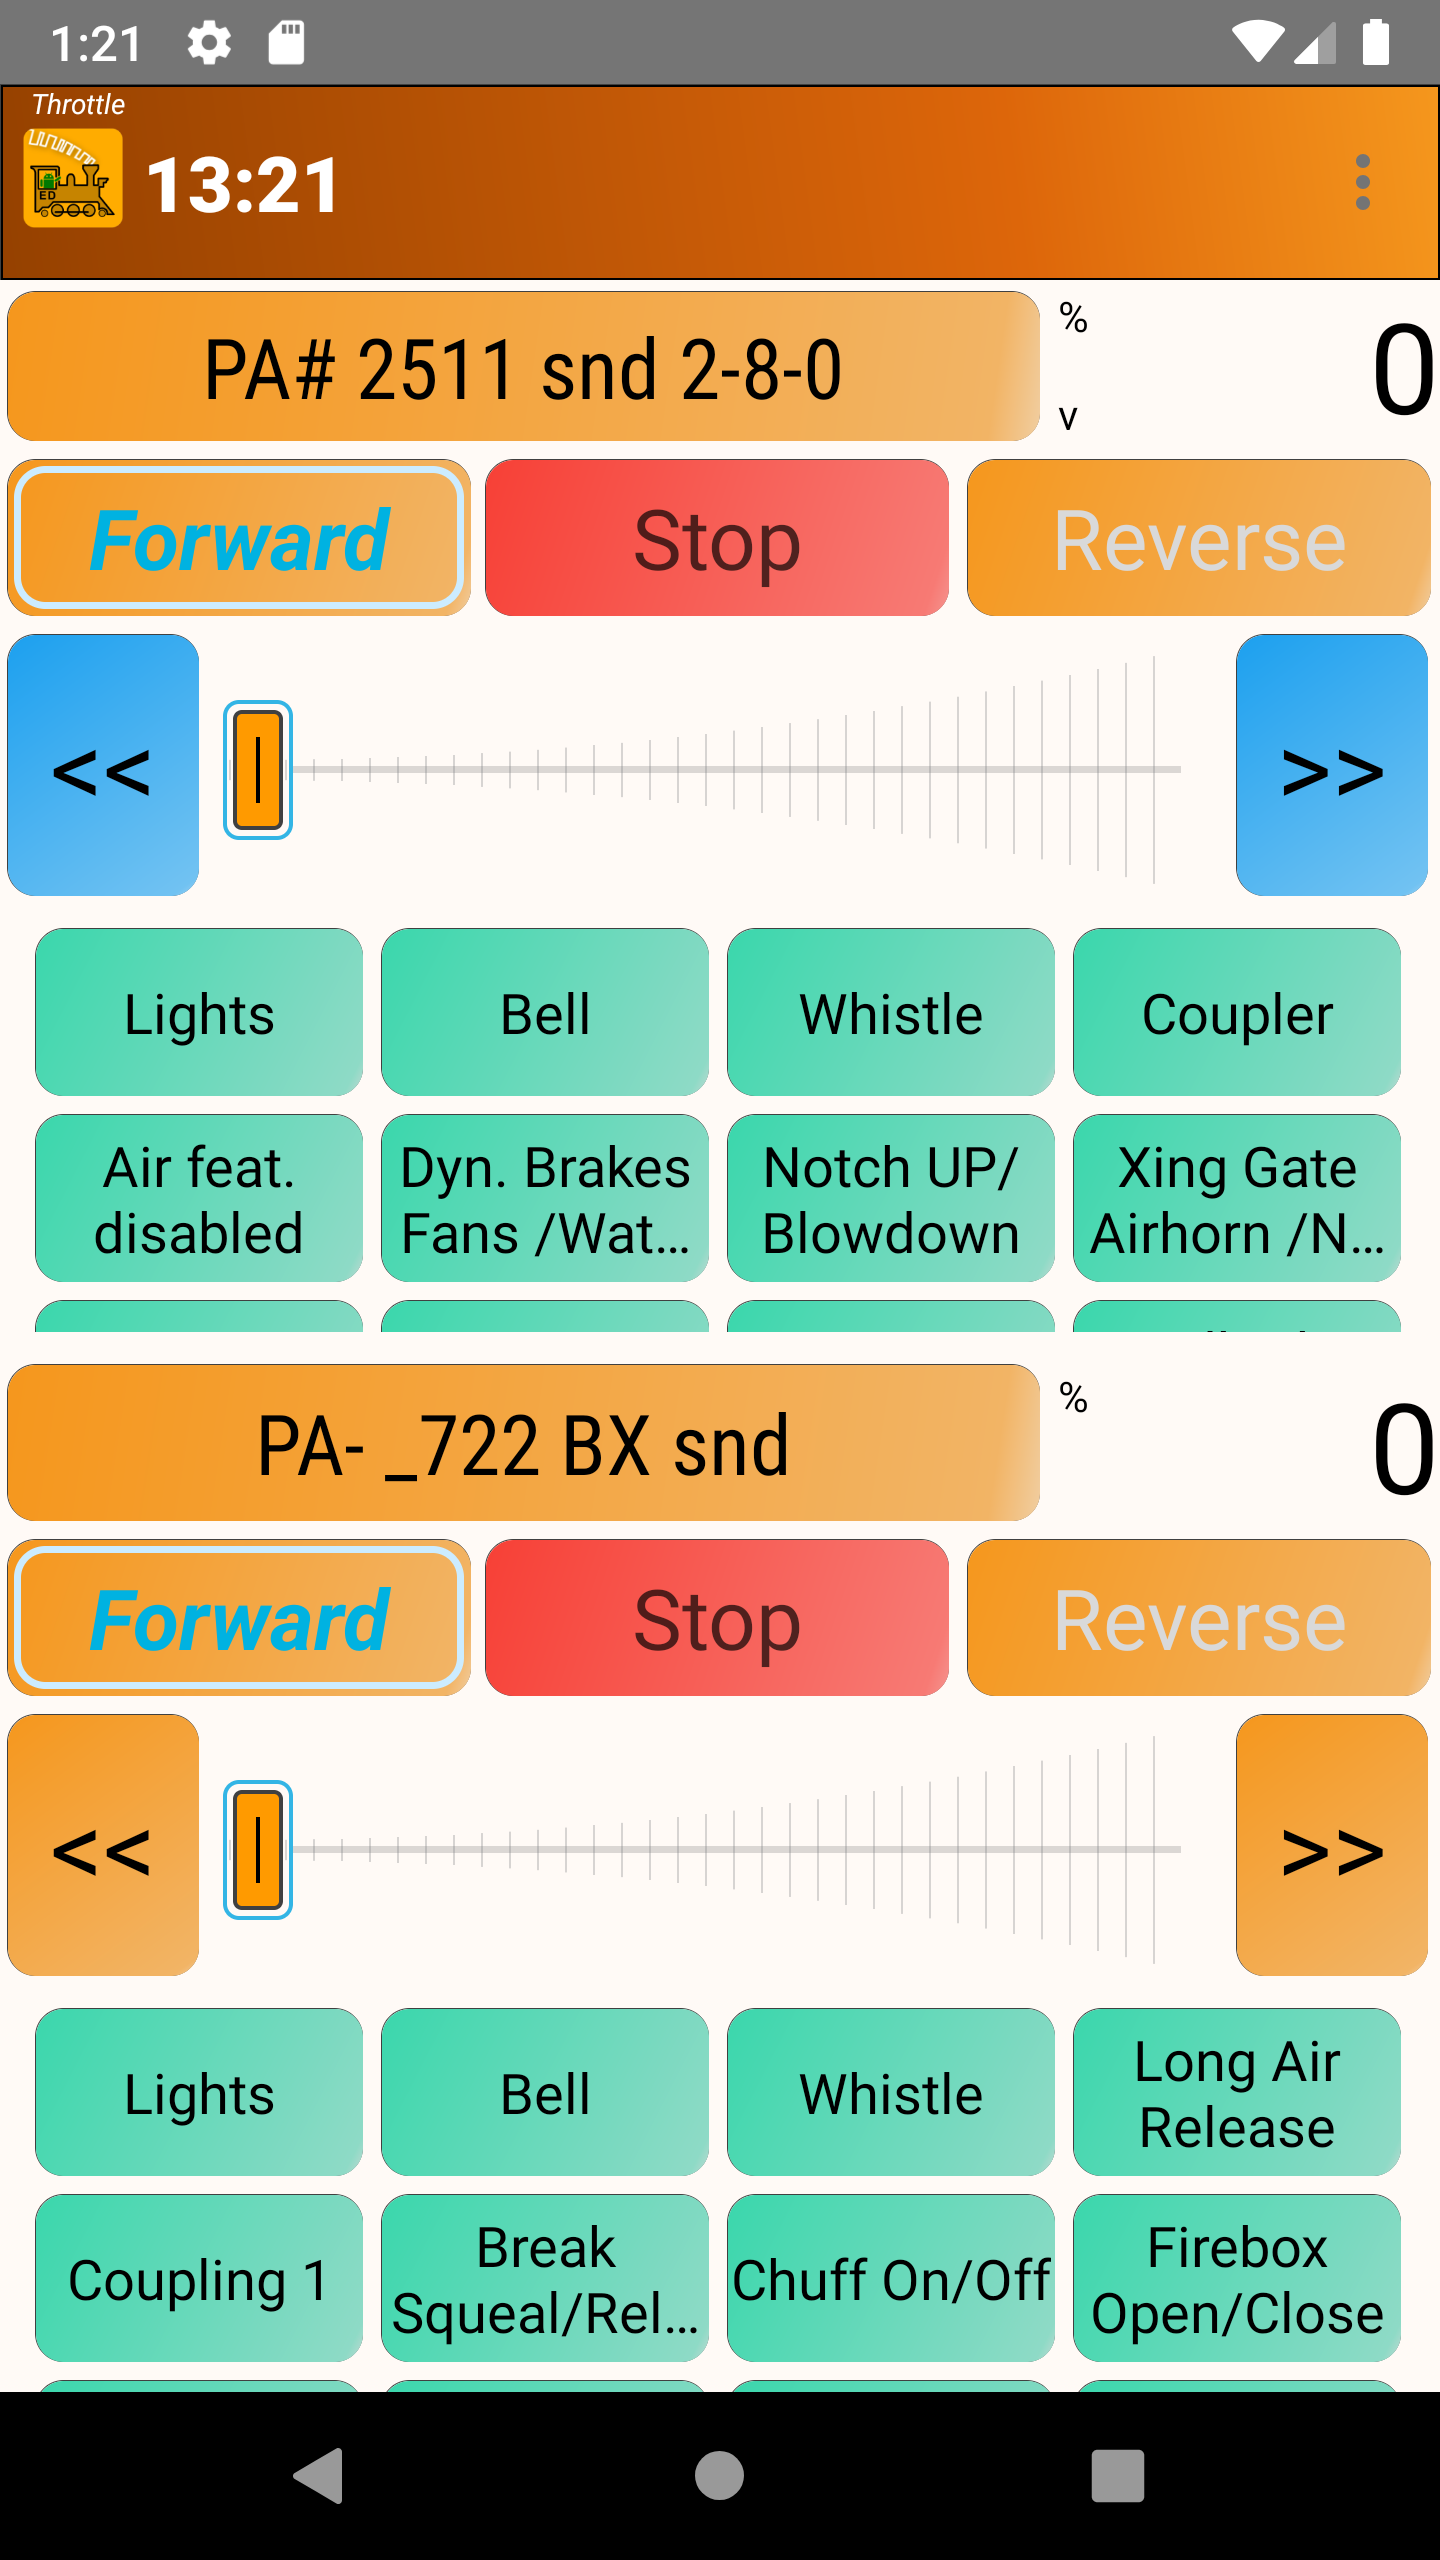
Throttle Screen
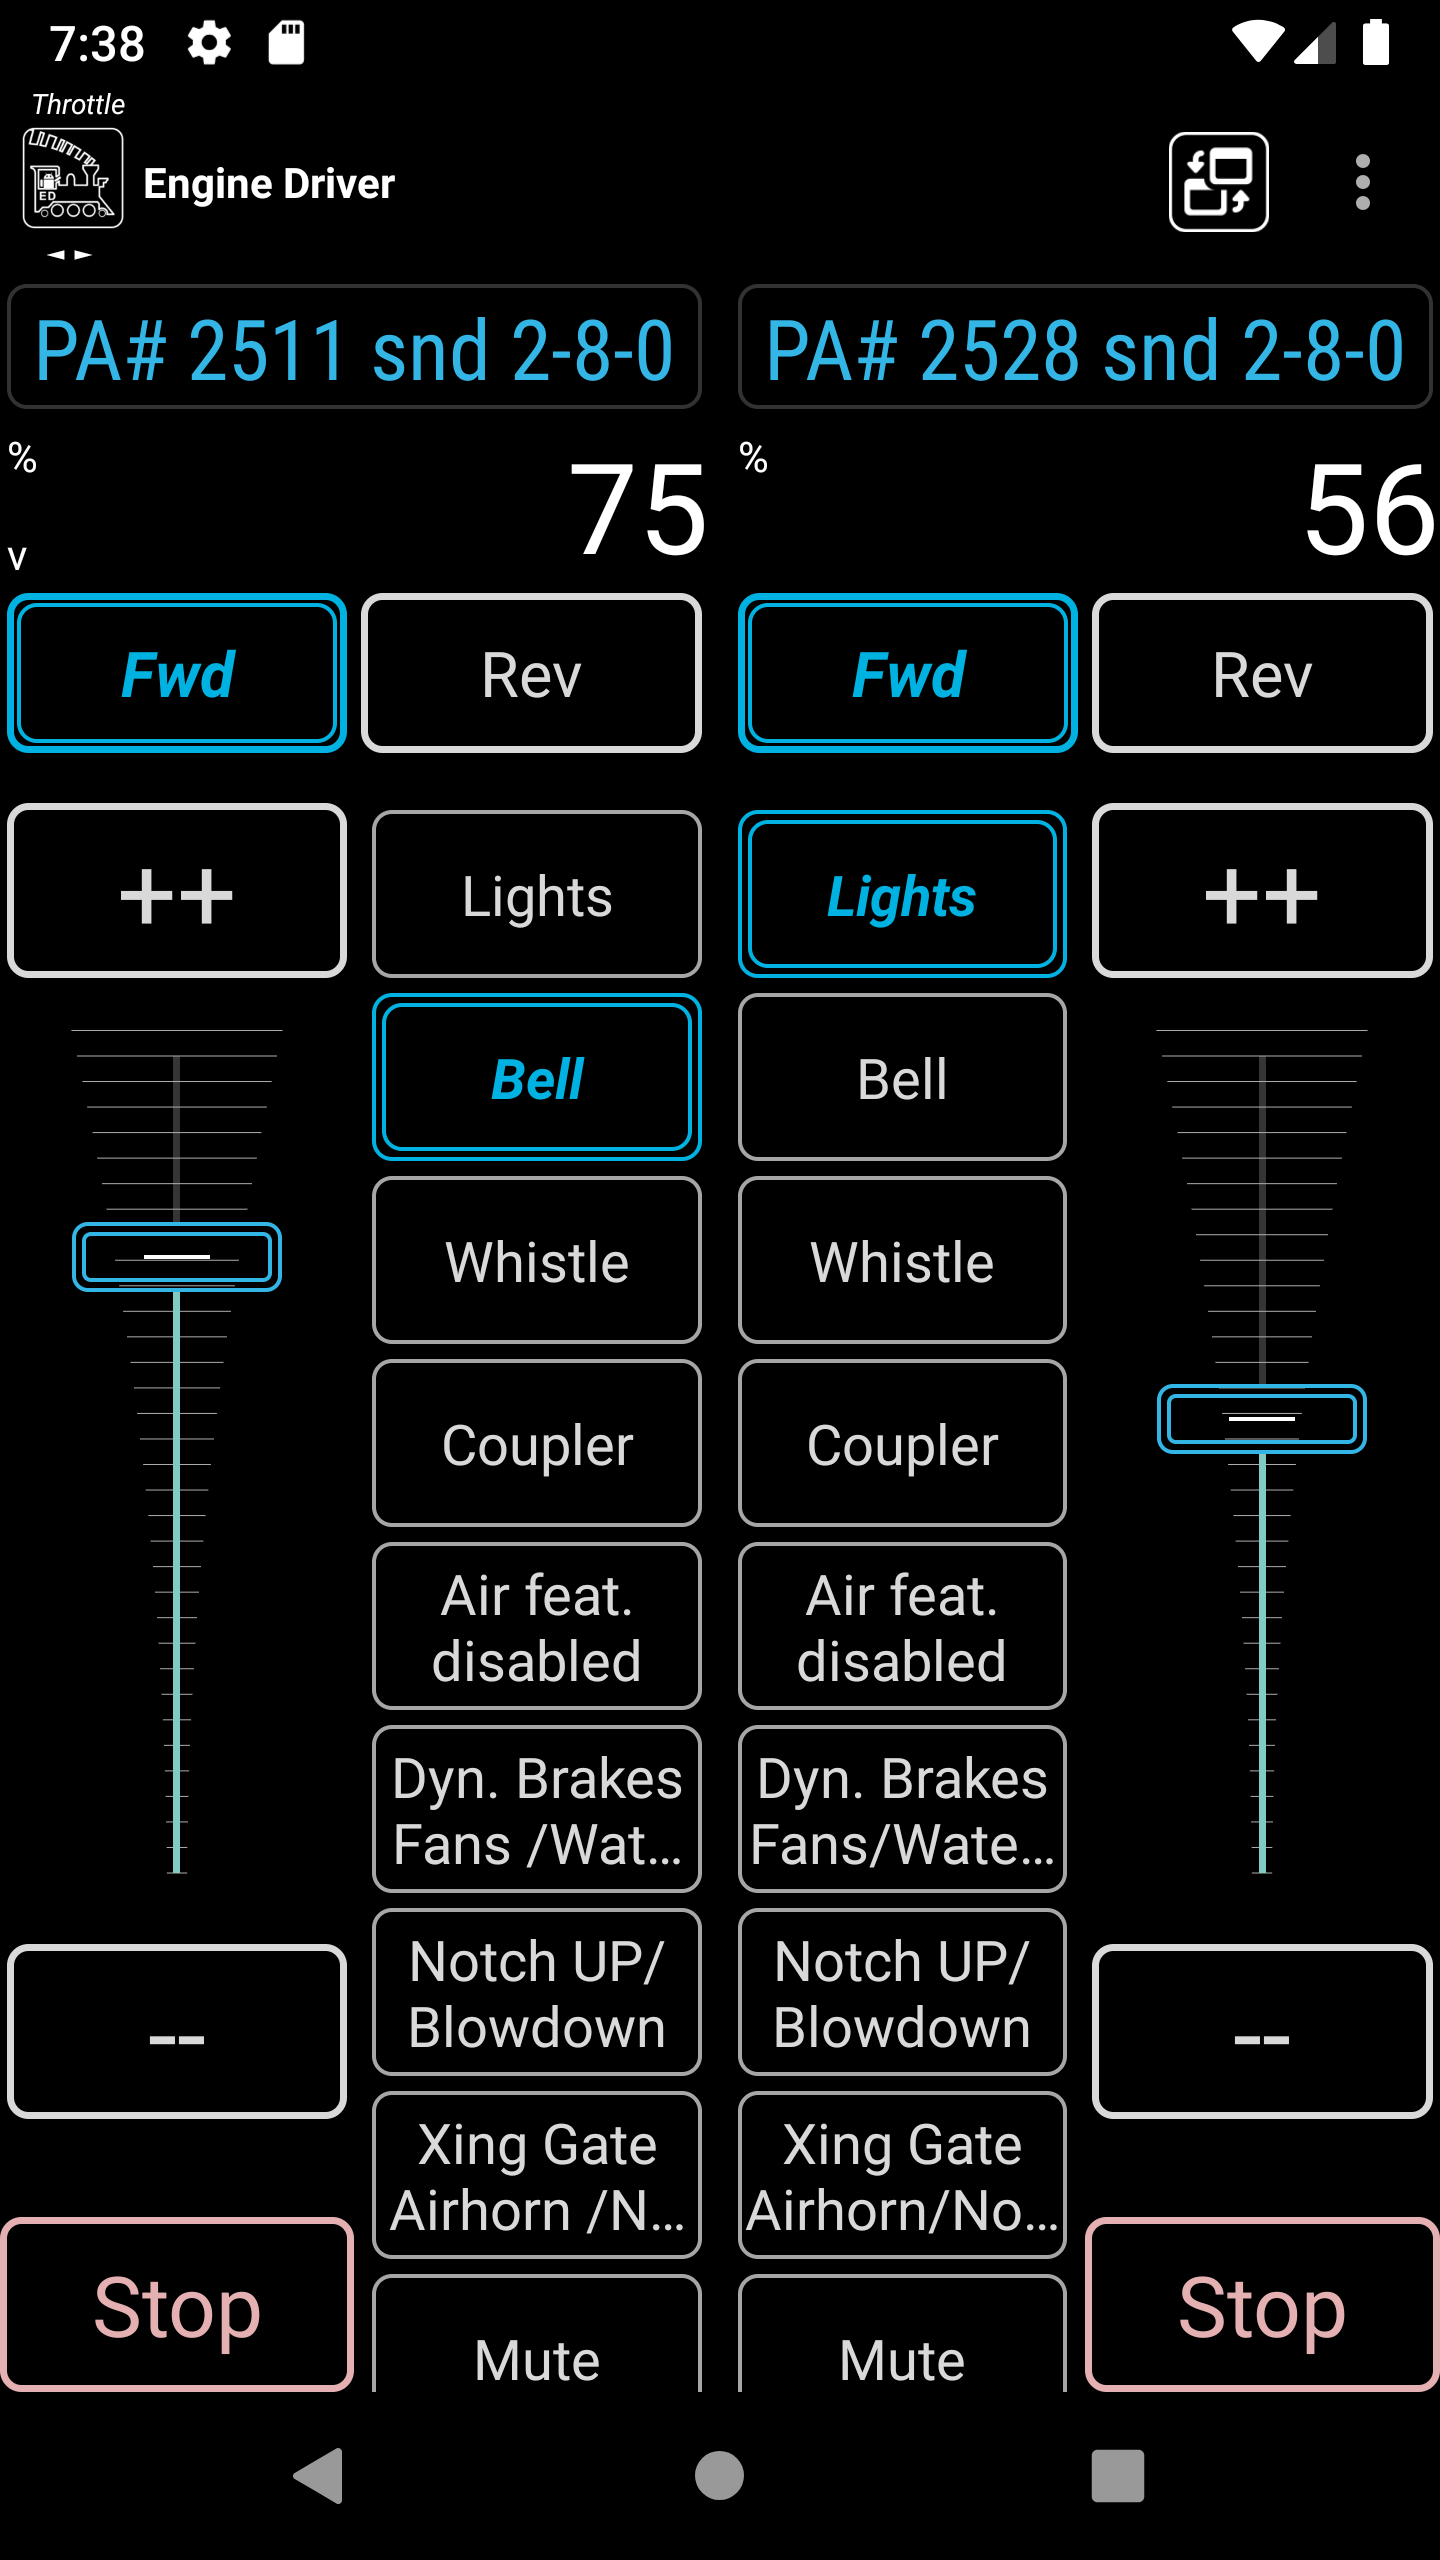
The Throttle Screen has two distinct areas:
The Action Bar
One or more Throttle Areas
There are also some settings that impact the whole Throttle Screen which described towards the end of this section:
Background
Immersive Mode (Full Screen)
Swipe Up / Down
Accelerometer (Shake)
The Throttle Screen allows you to control:
Access common functions from the Action Bar and Menu
Control one or more locos
The Throttle Screen contains between 1 and 6 Throttle areas depending on the Throttle layout chosen and the number of throttles for that layout (only some allow this to be changed).
Throttle Area
Each Throttle on the Throttle Screen will display different information and buttons depending on the Throttle Screen Layout in the Throttle Screen Layout preference.
Each Throttle Area allows you to:
Select and release locos
Control the speed and direction of your trains
Activate DCC decoder functions like the light, bell, horn
Activate Virtual (IPLS) Sounds (bell, horn, short horn) (if enabled)
Speed indicator
The Speed Indicator or Speed area of each throttle of the Throttle Screen indicates the throttle amount/setting (rather than the actual speed of the locos controlled by the the throttle).
Depending on the Speed Units Preference the upper value show will be different:
Speed Unit Setting
Low value
High Value
Percent 0 - 100%
0
100
Auto Speed steps
?
?
8 steps
0
8
10 steps
0
10
14 steps
0
14
28 steps
0
28
128 steps
0
128
Also, if one of the Shunting/Switching layouts is selected, the high number will be negative (‘-’) when reversed (e.g. -100 - 0 - 100)
The Speed Indicator area also can show:
Volume indicator
Gamepad Indicator
Direction indicator (Shunting/Switching Layouts only)
Volume Indicator
A ‘V’ will be shown in the Speed Indicator area to indicate which throttle is being controlled by the hardware volume buttons. Touch another Speed Indicator to change which Throttle the Hardware Volume buttons control.
Gamepad Indicator
A number (‘1’,’2’, etc.) will be shown in the Speed Indicator area to indicate which throttle is being controlled by the each connected gamepad. Set one of the gamepad to allow you to switch throttle it controls.
Direction Indicator
If one of the Shunting/Switching layouts is selected, a triangle symbol will be shown to indicate direction (pointing Up for forward, and down for reverse).
Note
See the Throttle Control Preferences section of the Speed Units preference for a information on changing the
Speed Unitsoptions.
Speed Slider Area

The Throttle areas can be configured with a Speed Slider. (All Throttle Screen layouts except the ‘Big Button’ layouts include sliders by default.) Dragging you finger along the slider will increase or decrease the speed of the loco(s) selected for the that Throttle. Pressing and holding your finger at one spot on the slider will cause Engine Driver to slowly increase or decrease the speed of the loco(s) selected for that Throttle till it gets to that point.
Depending on the
Throttle Screen Layoutchosen in the Throttle Screen Layout preference, all sliders on the Throttle Screen will be either:
one-directional (0% - 100%) 1
orbi-directional (-100% - 0 - +100%)
Bi-directional sliders are useful for when you are switching/shunting. i.e. moving your locos backwards and forwards a lot.
Several preferences can change the appearance or actions of the Speed Slider:
Increase Slider/Speed Height?
When set, this preference will show a taller Slider, or Speed buttons, for throttlesThrottle Speed Slider Margin
When set, this changes the space between either the edge of the screen and the ends of the Slider, or if the Speed Buttons are enabled, the edge of the Speed Buttons and the ends of the Slider. Specific in pixels haw far to offsetHide Speed Slider?
When this preferences is set, Engine Driver will not show speed slider, use speed buttons insteadTick Marks on Speed Sliders?
When this preferences is set, Engine Driver will show tick marks on the background of the Speed SlidersSwitching throttle Dead Zone
When this preferences is set, Engine Driver will set the size of the dead zone, or detent, on the slider of the Switching/Shunting Throttle ScreenStop Button Vertical Margins
When this preferences is set, Engine Driver will add the entered number of pixels to offset margins of the stop button from the speed buttons and bottom of screen
- 1
The actual amounts shown in the Speed Indicator will depend on the
Speed Unitschosen in the Speed Units preference.
Stop Button
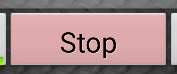
Clicking the
Stopbutton of a throttle will the loco or consists / multiple unit controlled by that throttle. If the locos have momentum configured in the decoded it/they will slow then stop.Note
See the Emergeny Stop Action Bar button for information on stopping locos immediately, overriding the momentum setting.
Speed Buttons

The Throttles may optionally be configured have simple buttons that allow you to increase or decrease the loco’s speed in pre-defined steps. The buttons are displayed at either end of the speed sliders.
When enabled:
the ++ will increase the throttle speed by the Speed Button Change Amount.
the – will decrease the throttle speed by the Speed Button Change Amount.
For the Horizontal Sliders only, The position of these buttons in relation to the speed sliders (the space between), can be altered with the Speed Slider Margin preference.
Note
See the Display Speed Buttons? preference for more information on enabling these buttons.
See the Speed Button Change Amount preference for information on the abount that
Direction Buttons Area
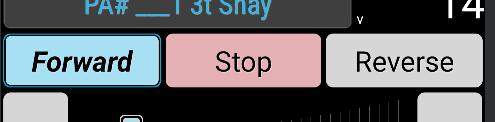
Each Throttle on the Throttle Screen will display Forward and Reverse direction buttons, depending on the
Throttle Screen Layoutin the Throttle Screen Layout preference. ‘Shunting/Switching’ layouts do not show the direction buttons.Change direction while moving preference.
Note
See the Direction change while moving? and Stop on Direction change? preferences for information on preferences which alter when the buttons are available and the way the they work.
Web View Area (Throttle Web View)
Todo
Web View Area (Throttle Web View)
Shows a web browser in the lower half of the Throttle Screen.
Your JMRI Layout panels can be displayed here if you have configured them in JMRI.
Anything that can be shown in the Web View Screen can equally be shown here, just in a smaller space.
Note
see preference
see initial page preference
different to the main Web View Screen including a different preference to set the initial page.
see increase size
Action Bar (Throttle Screen)

The Action Bar appears at the top of all screens. It will show different information and different buttons depending on a) the particular screen and b) preferences you have set.
In the Throttle Screen the Action Bar can display:
The app name (Engine Driver)
Optionally configured information:
Fast Clock
Children’s Timer Status and Countdown
Full Screen or Action Bar Only left/right swipe
WiThrottle Server Name
Optionally configured buttons:
Emergency Stop (EStop)
Track Power
Flashlight
Throttle Web View
Throttle Layout Switching
In Phone Loco Sound
Children’s Timer
Note
The optional buttons are enabled via the .
See the Action Bar section of this page for more information.
Overflow Menu (Throttle Screen)
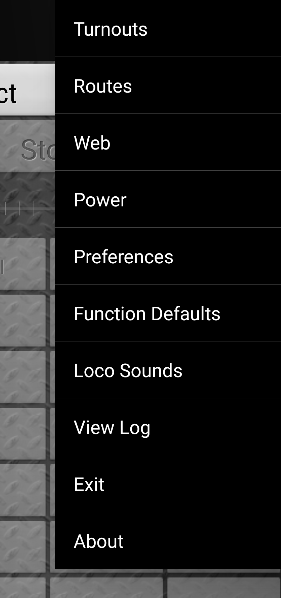
The Overflow Menu (or simply ‘Menu’) appears in the Action Bar at the top of most of the main screens is normally three dots (⁞) or three bars (≡). It will show different options depending on a) the particular screen, b) preferences you have set and c) the state of certain elements in the app.
Specific to the Throttle Screen, the Overflow Menu can display:
Turnouts/Points (All except the Turnout/Points Screen only)
Routes (All except the Routes Screen only)
Function Defaults (Throttle Screen only)
Gamepads (Throttle Screen only)
Loco Sounds (Throttle Screen only)
Note
See the Overflow Menu section for more information.
Background
Engine Driver can show a background image of your choosing on the Throttle Screen. Any image/photo on your device/phone can be used.
Note
See the Background Images section of the preferences for more information on how to select a background image.
Immersive Mode (Full Screen)
Todo
Immersive Mode (Full Screen)
Swipe Left / Right (From Throttle)
Swiping Left from the Throttle Screen will take you to the Routes Screen, unless it has been disabled in the preferences
Swiping Right from the Throttle Screen will take you to the Turnouts/Points Screen, unless it has been disabled in the preferences
By default, you can Left/Right Swipe from any part of the screen, but this can be changed to just the Action Bar in the preferences. This can be useful if Left/Right swipes in the Web View Screen and Throttle Web view causes problems.
Note
See the Left right swipe preferences for information on how to enable and disable which screens are in the Left / Right swipe sequence.
See the Disable Full Screen Swipe prefernce to enable or disable the Swipe Action Bar only option.
Swipe Up / Down
Todo
Swipe Up / Down
Accelerometer (Shake)
Todo
Accelerometer (Shake)
Turnouts/Points Screen
Todo
Turnouts/Points Screen
Accessed from any of the main screens by the or or by swiping right from the Throttle Screen if enabled in the Left with the Swipe through Turnouts? or Swipe through Points? preference:
This screen allows you to display all Turnouts/Points that have been defined in JMRI.
Turnouts/Points can be changed from Closed to Thrown and vice versa be pressing on either the Closed or Thrown buttons
List from WiThrottle
Throw
CLose
Entry
Todo
Turnouts/Points Screen - Entry
Filter by location
The ‘Turnout/Points List’ can be filtered. The filtering relies on the idea that the first part of every Turnout/Point name is a ‘Location’, followed by a common separator, then the actual name for the Turnout/Point name. The ‘filter’ then allows you to select one of those locations and Engine Driver can just show the Turnout/Points at the ‘Location’.
The Location Delimiter preference allows you to set the character that marks the end of the Location portion of Turnout/Point and Route names. By default it is a colon (“:”) but any character can be used.
Hide if no user name? preference
Action Bar (Turnouts/Points Screen)
The Action Bar appears at the top of all screens. It will show different information and different buttons depending on a) the particular screen and b) preferences you have set.
In the Turnouts/Points Screen the Action Bar can display:
The app name (Engine Driver)
Optionally configured information:
Fast Clock
Full Screen or Action Bar Only left/right swipe
WiThrottle Server Name
Optionally configured buttons:
Emergency Stop (EStop)
Track Power
Flashlight
Note
The optional buttons are enabled via the .
See the Action Bar section of this page for more information.
Swipe Left / Right (From Turnouts/Points)
Swiping Left from the Turnouts/Points Screen will take you to the Throttle Screen, unless it has been disabled in the preferences
Swiping Right from the Throttle Screen will take you to the Web View Screen, unless it has been disabled in the preferences
By default, you can Left/Right Swipe from any part of the screen, but this can be changed to just the Action Bar in the preferences. This can be useful if Left/Right swipes in the Web View Screen and Throttle Web view causes problems.
Note
See the Left right swipe preferences for information on how to enable and disable which screens are in the Left / Right swipe sequence.
See the Disable Full Screen Swipe prefernce to enable or disable the Swipe Action Bar only option.
Routes Screen
Todo
Routes Screen
Accessed from any of the main screens by the menu or by swiping left from the Throttle Screen if enabled in the Left with the Swipe through Routes? preference:
This screen allows you to display all Routes that have been defined in JMRI or DCC-EX EX-CommandStation.
Enter
Todo
Routes Screen - Enter
List
Todo
Routes Screen - List
Filter by location
The ‘Routes List’ can be filtered. The filtering relies on the idea that the first part of every Route name is a ‘Location’, followed by a common separator, then the actual name for the Route name. The ‘filter’ then allows you to select one of those locations and Engine Driver can just show the Routes at the ‘Location’.
The Location Delimiter preference allows you to set the character that marks the end of the Location portion of Turnout/Point and Route names. By default it is a colon (“:”) but any character can be used.
Hide Sys Route Names? preference
Hide if no user name? preference
Todo
Routes Screen - Filter
Action Bar (Routes Screen)
The Action Bar appears at the top of all screens. It will show different information and different buttons depending on a) the particular screen and b) preferences you have set.
In the Routes Screen the Action Bar can display:
The app name (Engine Driver)
Optionally configured information:
Fast Clock
Full Screen or Action Bar Only left/right swipe
WiThrottle Server Name
Optionally configured buttons:
Emergency Stop (EStop)
Track Power
Note
The optional buttons are enabled via the .
See Action Bar section of this page for more information.
Swipe Left / Right (From Routes)
Swiping Left from the Routes Screen will take you to the Web View Screen, unless it has been disabled in the preferences
Swiping Right from the Routes Screen will take you to the Throttle Screen, unless it has been disabled in the preferences
By default, you can Left/Right Swipe from any part of the screen, but this can be changed to just the Action Bar in the preferences. This can be useful if Left/Right swipes in the Web View Screen and Throttle Web view causes problems.
Note
See the Left right swipe preferences for information on how to enable and disable which screens are in the Left / Right swipe sequence.
See the Disable Full Screen Swipe prefernce to enable or disable the Swipe Action Bar only option.
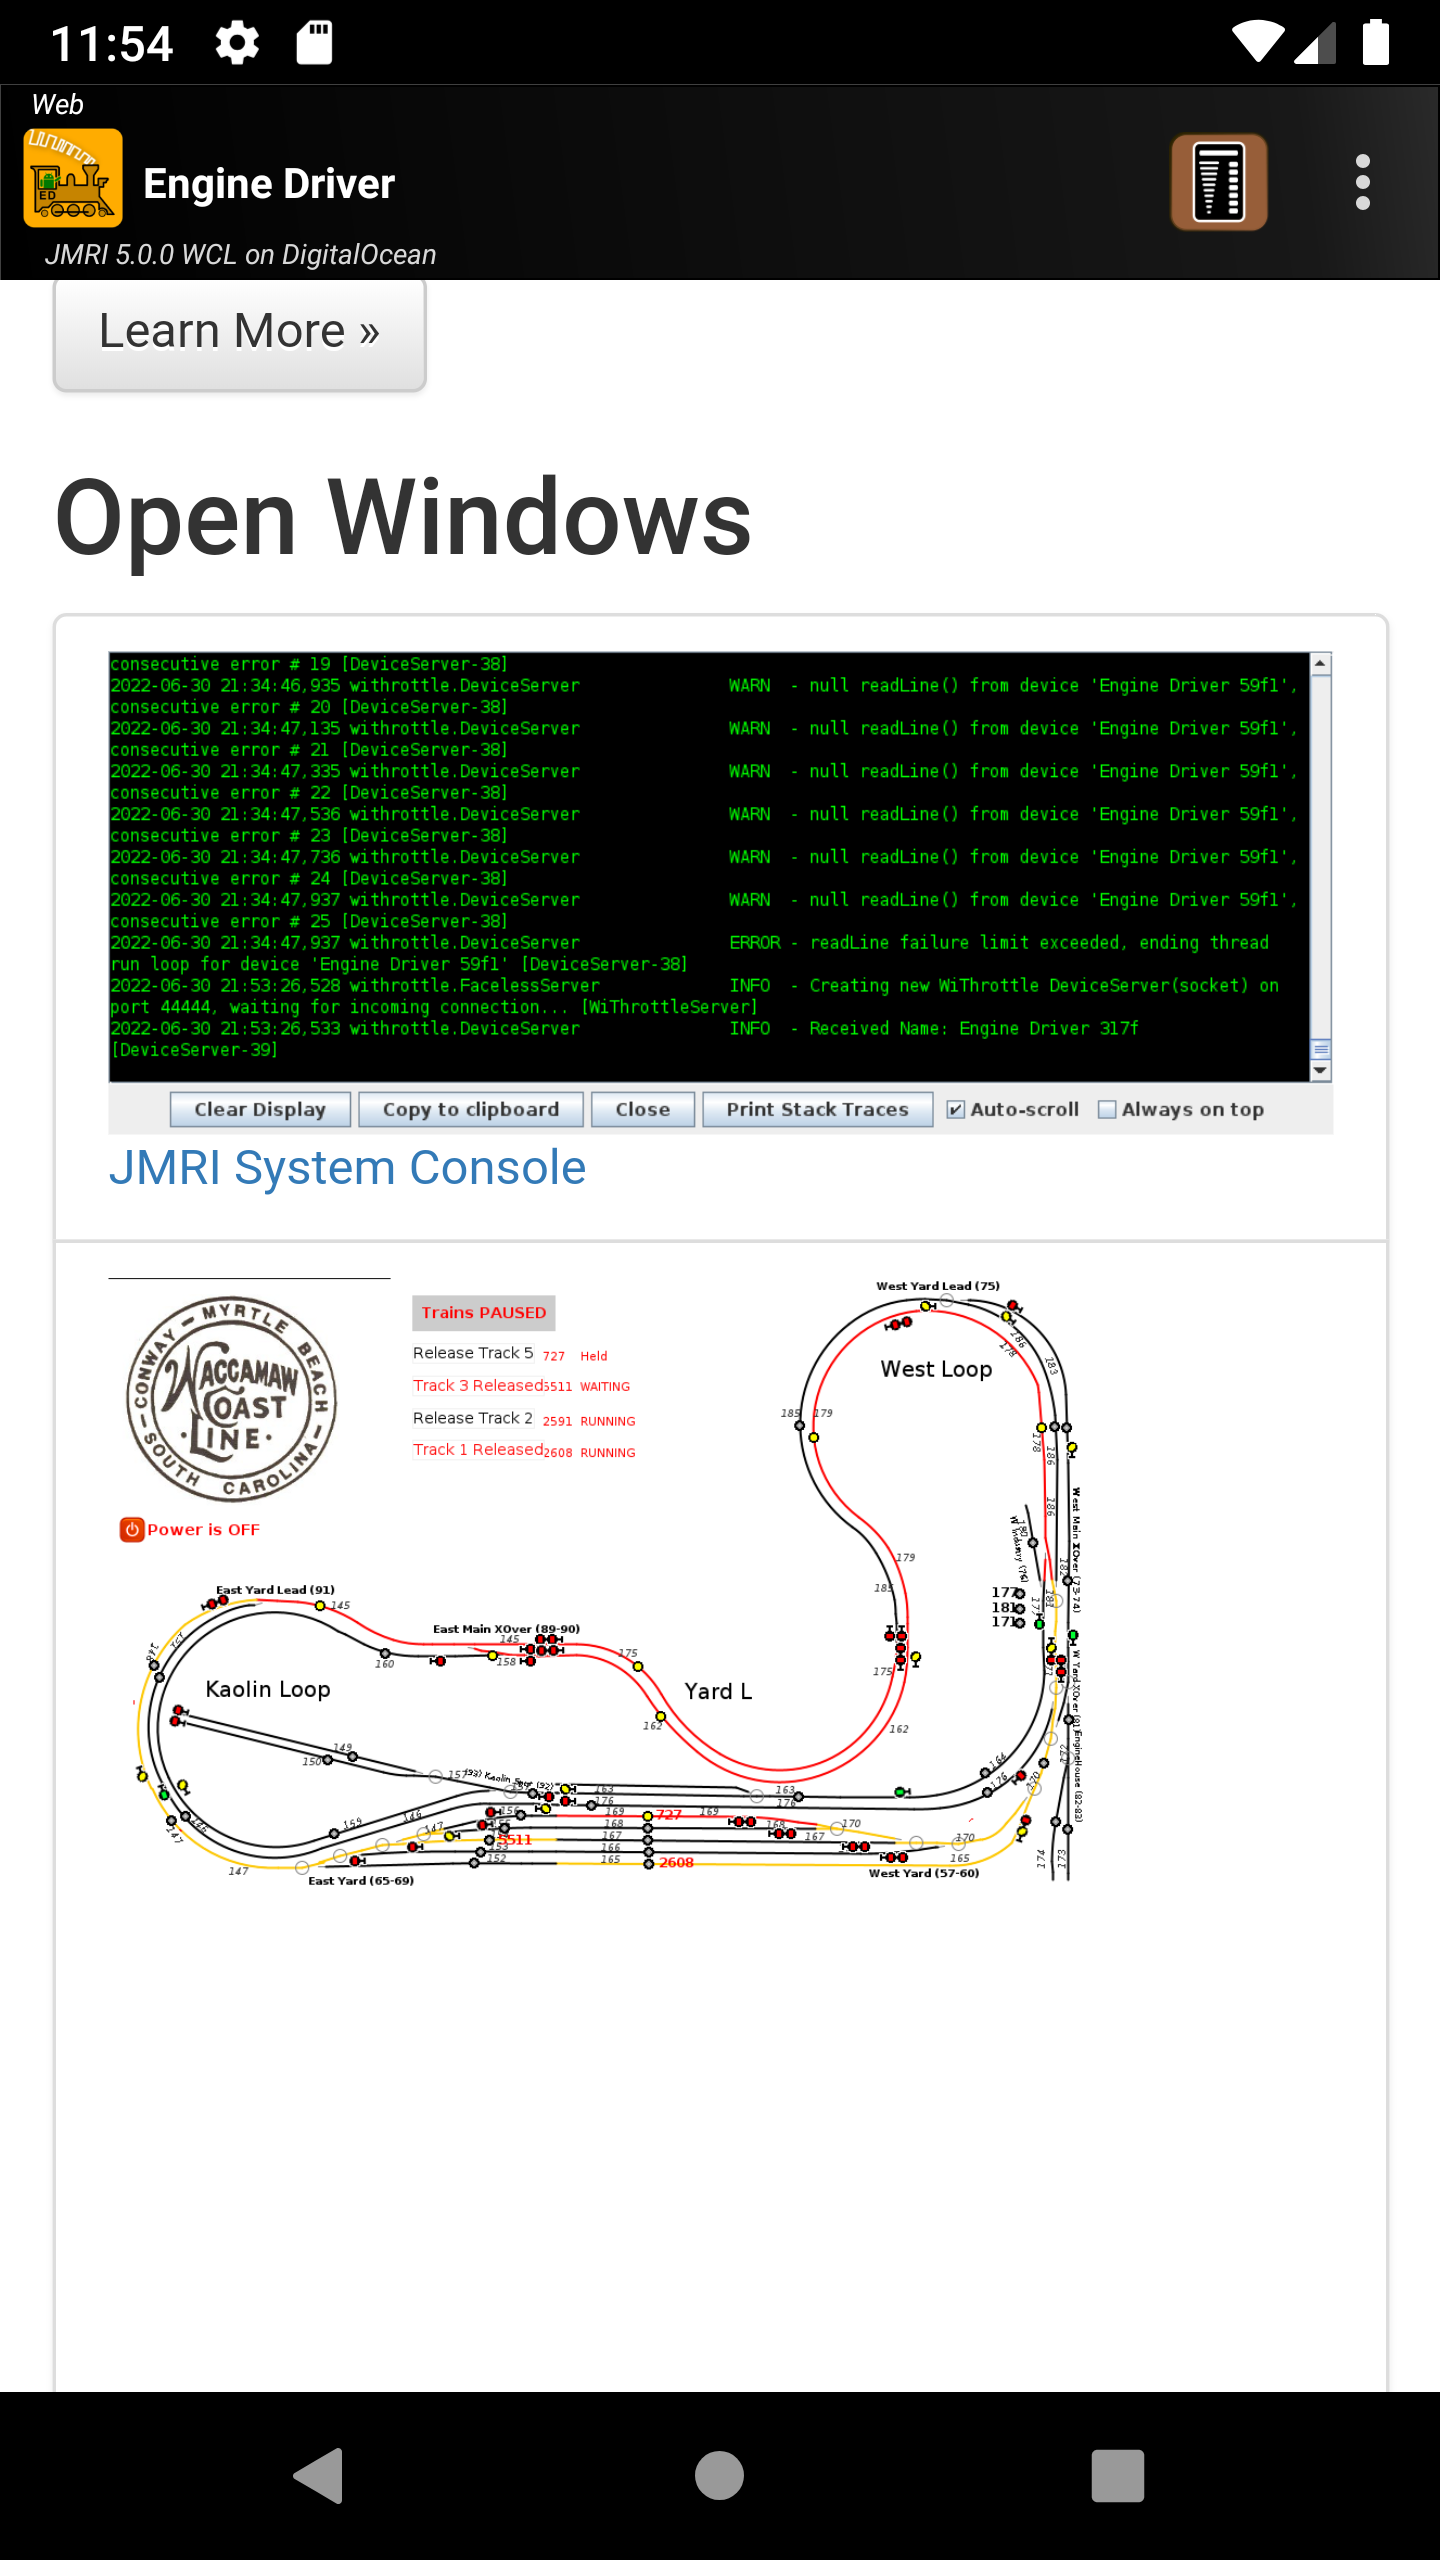
Web View Screen
Todo
Web View Screen
Accessed from any of the main screens by the menu or by swiping left or right twice from the Throttle Screen if enabled in the Left with the Swipe through Web? preference:
It can also be accessed, if the Screen orientation preference is set to Auto Web, by rotating the Android Device/Phone.
This screen displays a web browser interface that lets you view any web page. Normally this will be a web page on your JMRI server.
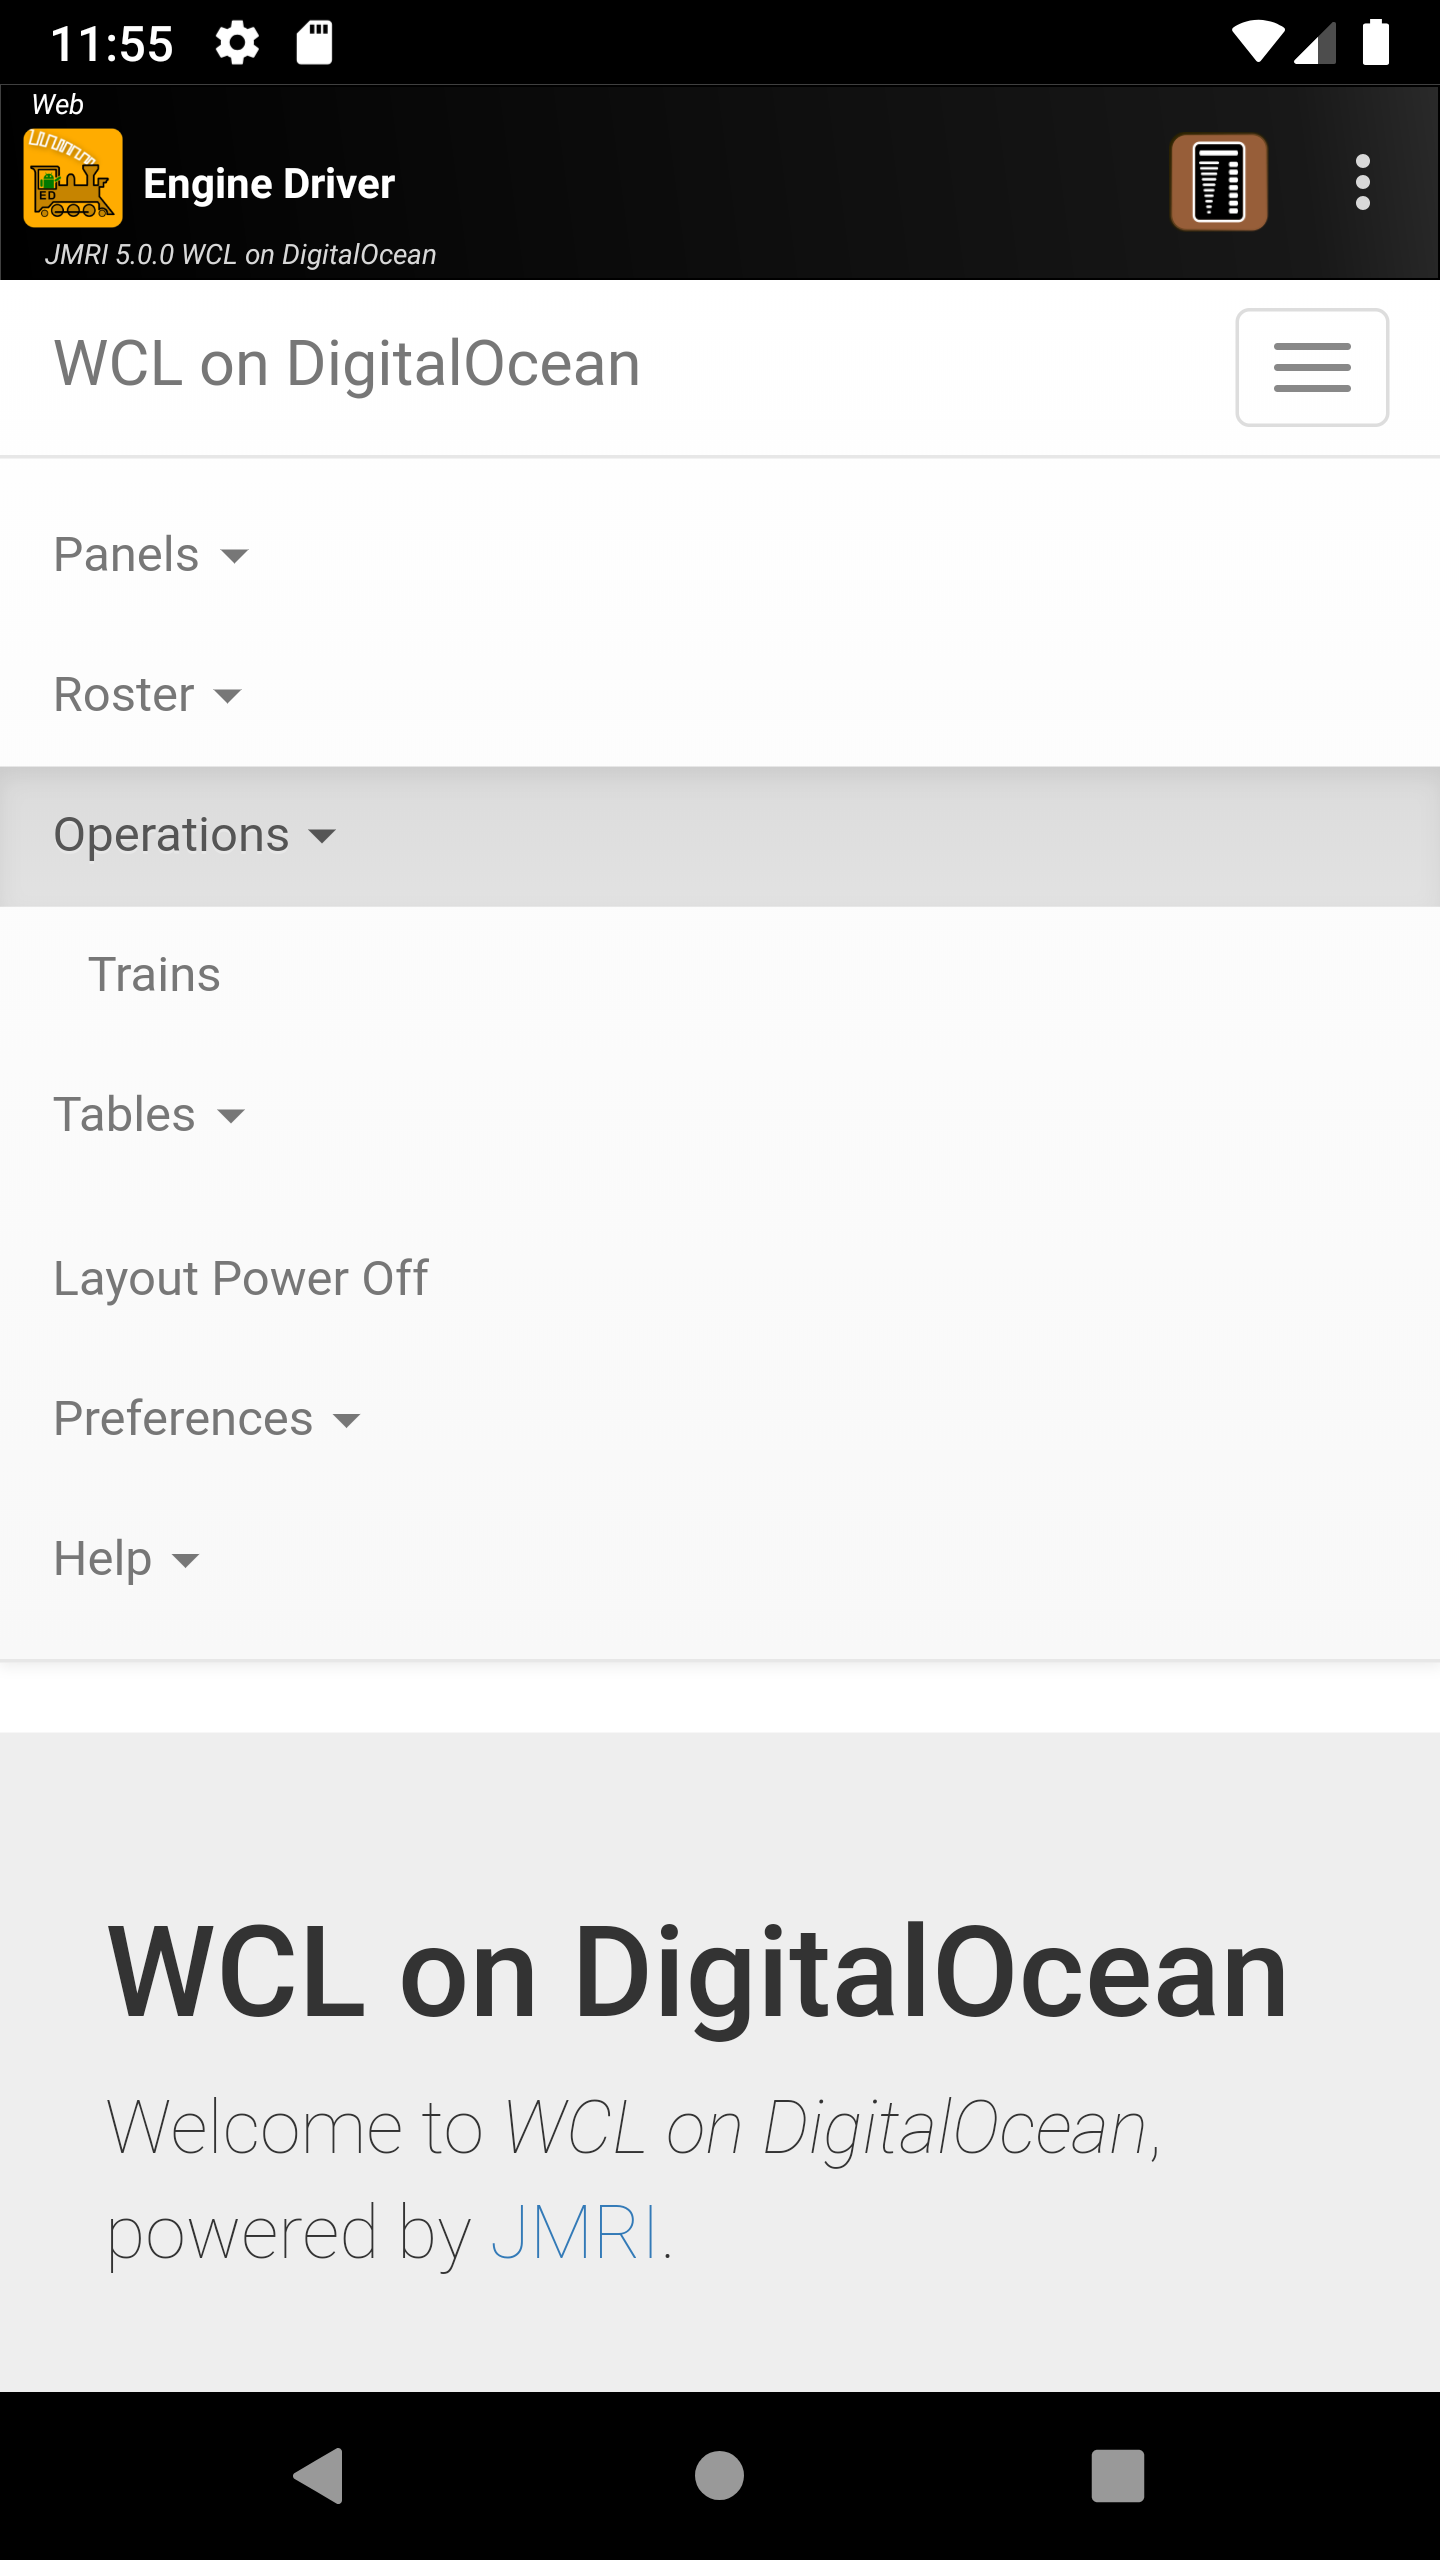
From the JMRI web server you can view and interact with additional features of JMRI. The menu at the top right of the web panel screen allows you to further display:
Rosters
Operations
Trains
Tables
Turnouts/Points
Sensors
Routes
Reporters
Memories
Blocks
Layout Blocks
Lights
Signal Masts
Signal Heads
Locations
Cars
Engines
ID Tags
This can be used for:
A webThrottle screen
Your JMRI layout panel(s)
Any URL in a full screen. This is in addition to being able to display your JMRI layout panel in a small section of the main Throttle Screen.
Tap on any of the Open Windows to expand its view. You can then resize the panel by pinching and zooming. It is sometimes useful to rotate your device to landscape mode, so as to better view your layout.
Action Bar (Web View Screen)
The Action Bar appears at the top of all screens. It will show different information and different buttons depending on a) the particular screen and b) preferences you have set.
In the Web View Screen the Action Bar can display:
The app name (Engine Driver)
Optionally configured information:
Fast Clock
Full Screen or Action Bar Only left/right swipe
WiThrottle Server Name
Optionally configured buttons:
Emergency Stop (EStop)
Track Power
Note
The optional buttons are enabled via the .
See Action Bar section of this page for more information.
Swipe Left / Right (Web View Screen)
Todo
Swipe Left / Right (Web View Screen)
Secondary / Support Screens
The follow additional screens will be shown at different times and for various reasons:
Intro/Setup Wizard Screen
The Setup Wizard will start automatically the first time you run Engine Driver after you install it. It sets some basic preferences and asks for the necessary permissions. These preferences can be subsequently be changed use the : , or by re-running the wizard, which can only be done from the menu on the Connection Screen.
Note
See the Setup wizard page for more information.
Loco Select Screen
The Loco Select Screen allows you add locos to a (one of) throttle on the Throttle Screen. It also provides access to the additional screens for ‘Editing the Consist’, ‘Editing Lights’ and editing the ‘In Phone Locos Sounds’.
The Loco Select Screen is only shown when you click a Select button on the Throttle Screen.
Not that the Select button will should the Address(es) or the Name(s) of a Loco or Consist/Multiple Unit Train only the first loco is selected. Click on the button will (while it is in this state) will again take to this screen to allow to you add additional Locos to the Consist/Multiple Unit Train, or make other changes to the Consist/Multiple Unit Train.
Selection Method
There are four ways you can choose a loco for the Throttle. Select one of the radio buttons depending on how you want to the choose the loco:
DCC Address
Server Roster
Recent Locos
Recent Consists
Select by DCC Address
Todo
Select by DCC Address
Shown if you select DCC Address in the Selection Method.
You can enter the loco’s DCC address (verify short or long), and press Acquire to select the loco. You will then be taken back to the Throttle Screen with that loco selected.
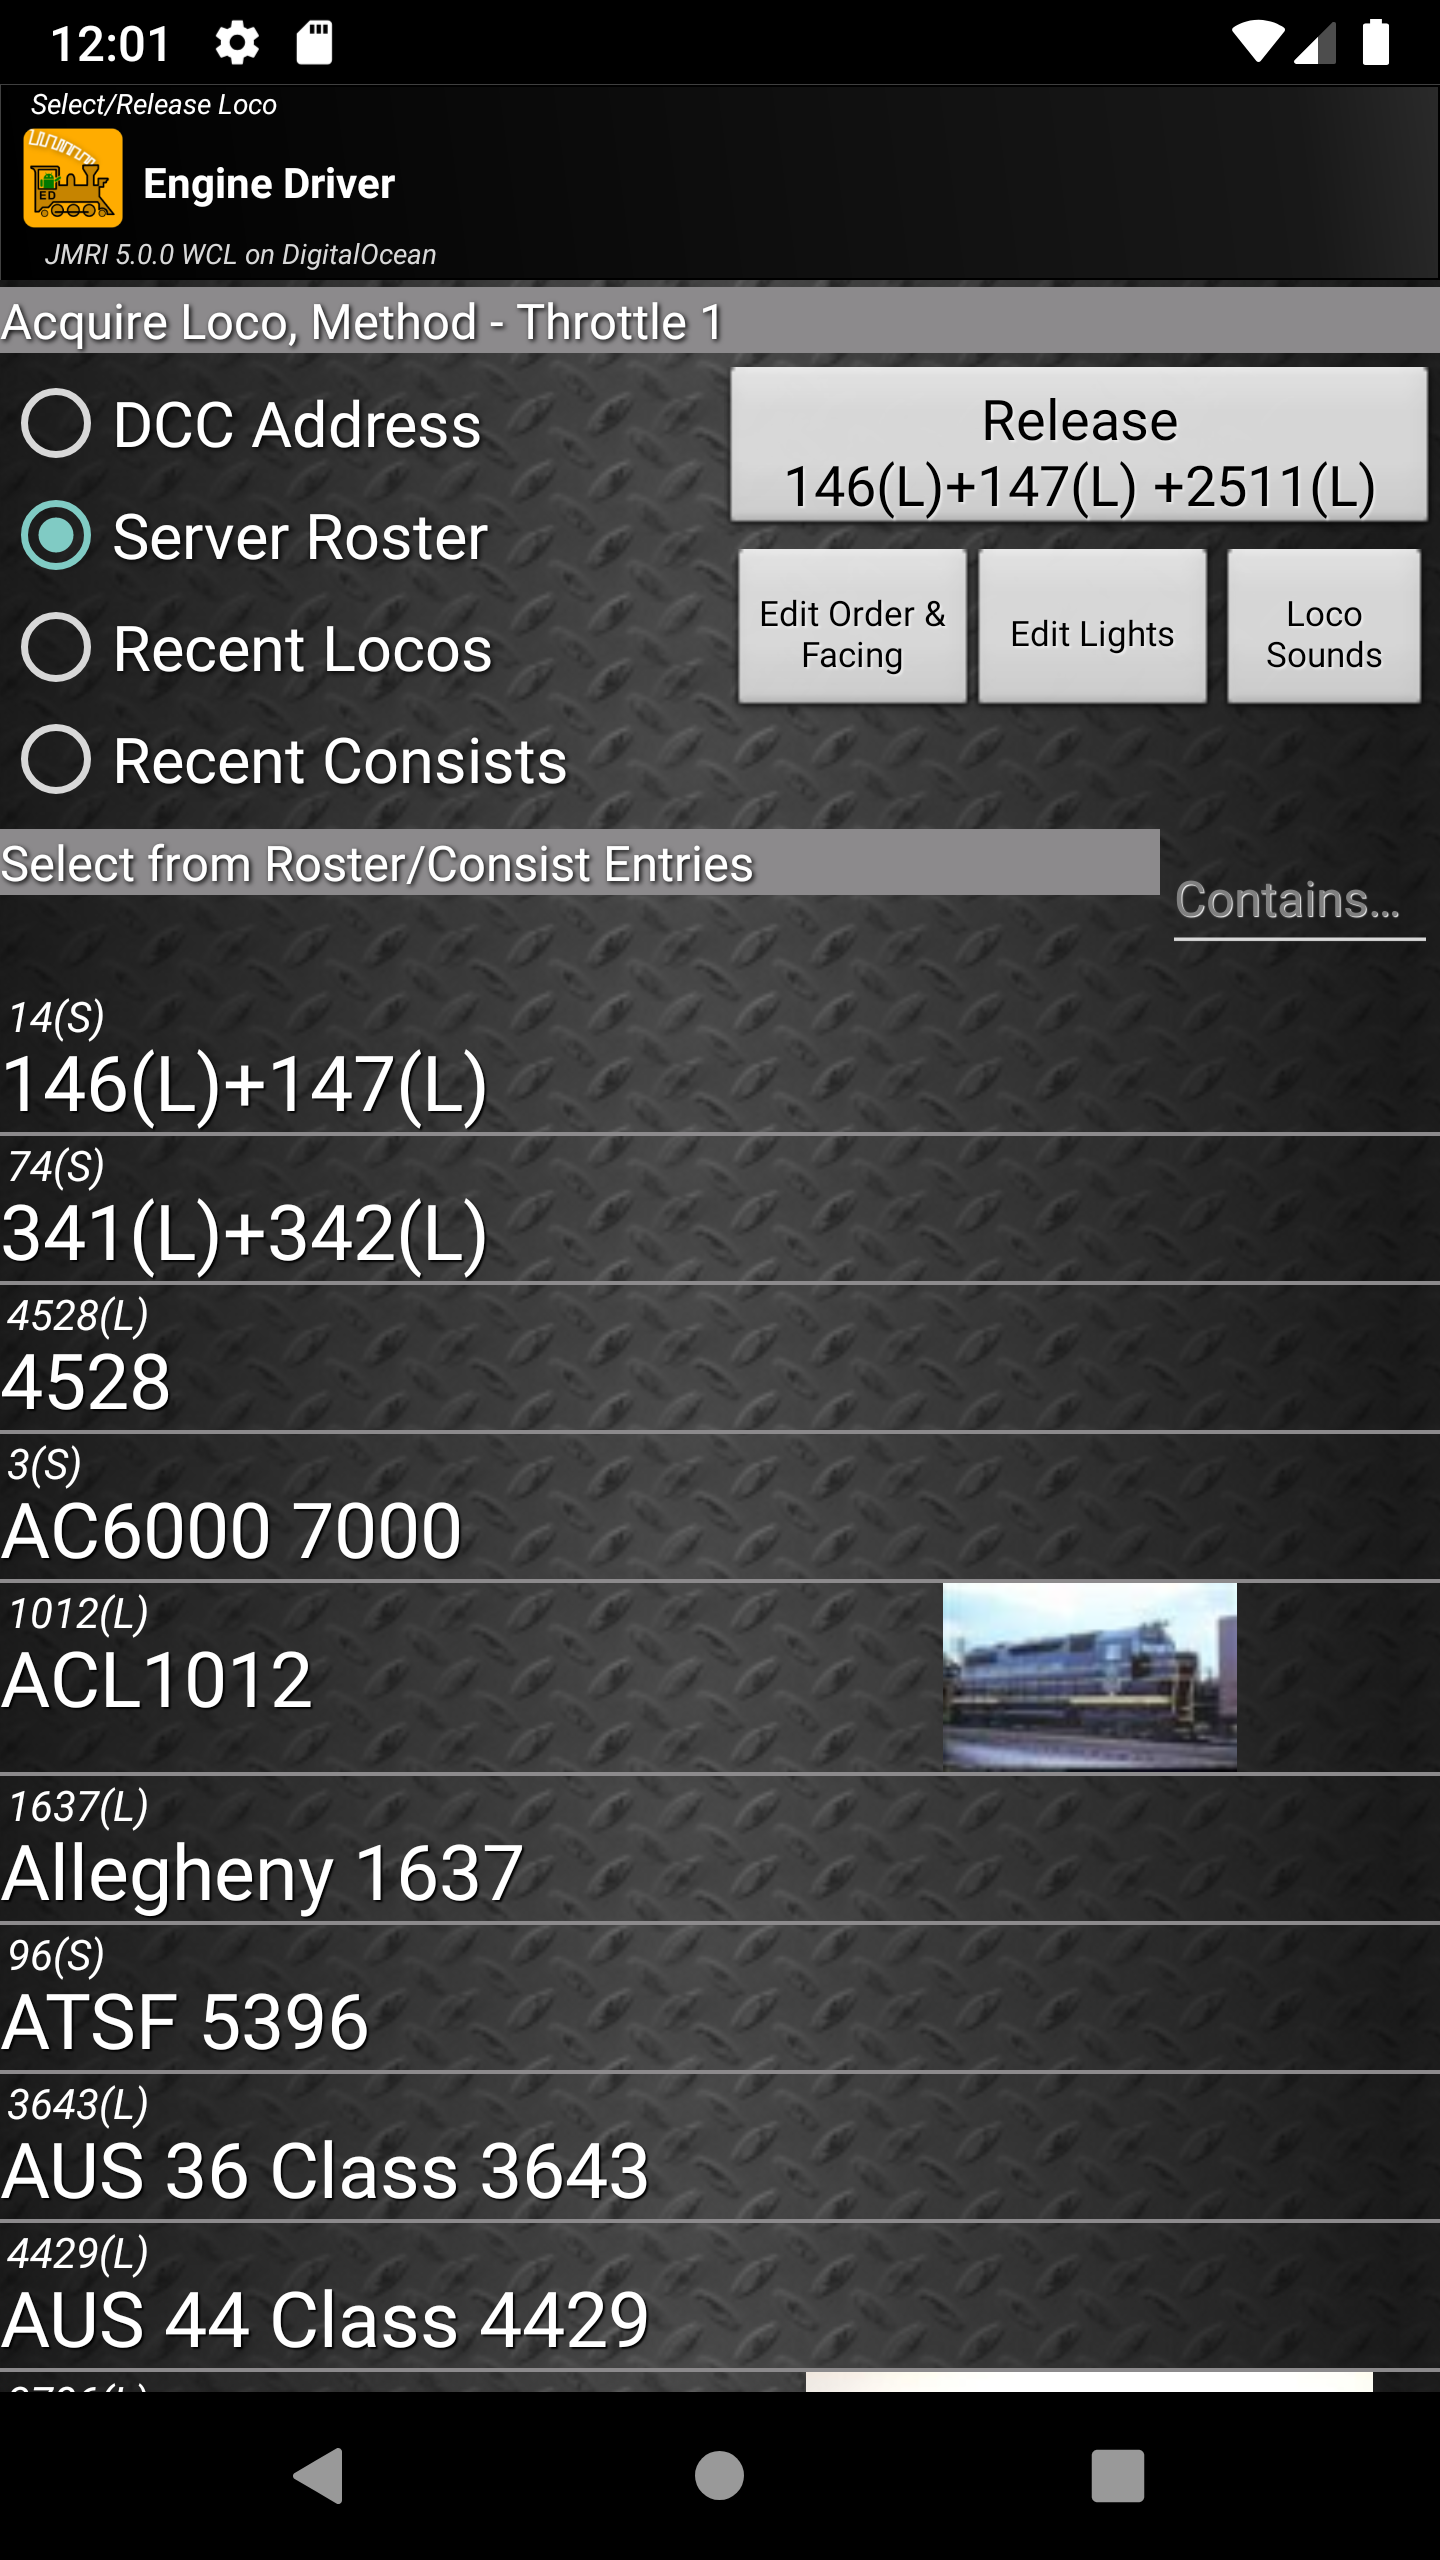
Select from Sever Roster
Todo
Select from Sever Roster
Shown if you select Server Roster in the Selection Method.
If the loco you want to control is in the list, simply click on it and you will be taken back to the Throttle Screen with that loco selected.
For this to be possible, the Loco you want to control needs to be in the roster of the WiThrottle Server. Not all WiThrottle Server support rosters. Refer to the JMRI documentation or your WiThrottle Server device’s documentation for creating a roster.
Filter
Icons
Icons - adding a local image
Long Press to see details… (and add icon)
Select from Recent Locos List
Todo
Select from Recent Locos List
Shown if you select Recent Locos in the Selection Method.
Engine Driver remembers the last 10 locos that you have selected. (That number can be increased or decreased with Maximum Recent Locos preference.)
If the loco you want to control to is in the list, simply click on it and you will be taken back to the Throttle Screen with that loco selected.
Icons - From Roster
Long Press to see details…
Swipe to remove entry…
Select from Recent Consists List
Todo
Select from Recent Consists List
Shown if you select Recent Consists in the Selection Method.
Selecting a Consist / Multiple Unit in the Recent Consists list will automatically add all the remembered locos, including their facing.
Swipe to remove entry…
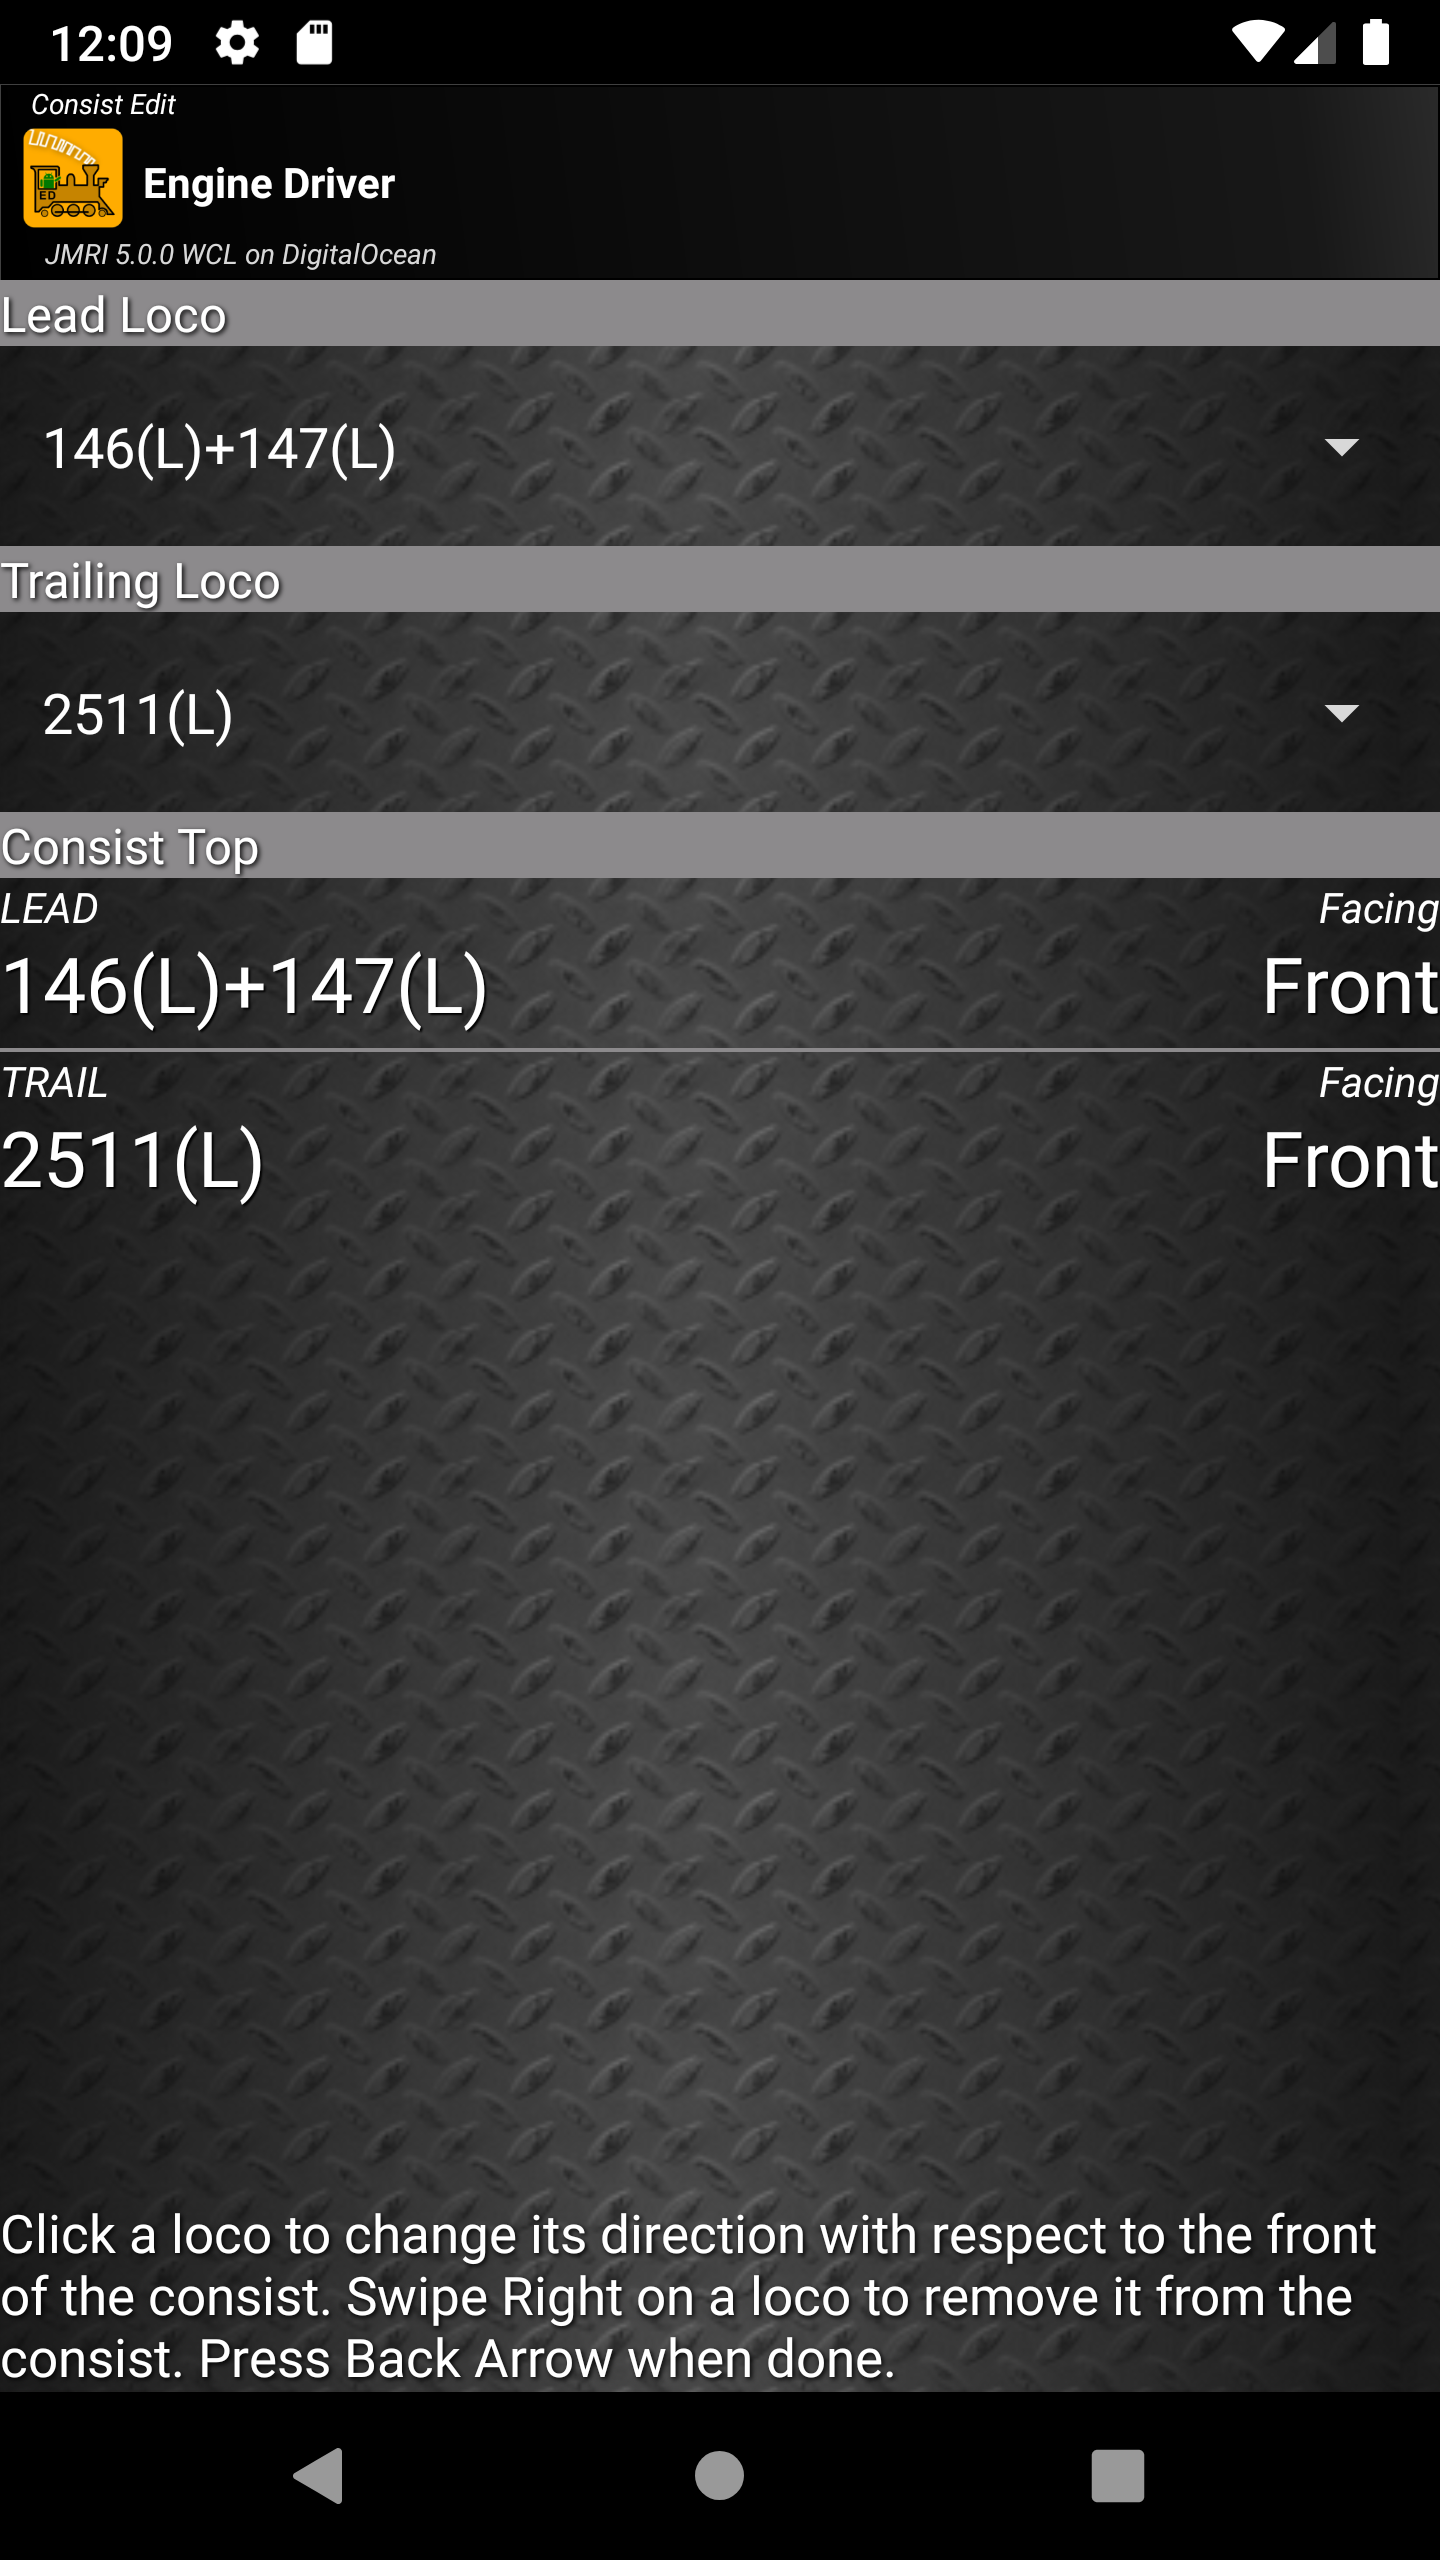
Consist Edit Screen
Todo
Consist Edit Screen
Shown if you add a second, or subsequent, loco to a throttle via the Select button, or if you click on the Edit Order & Facing button on the Select Loco Screen (which will only be available if you have already acquired more than one loco on the throttle.)
Lead Loco
Todo
Lead Loco
Trailing Loco
Todo
Trailing Loco
Consist Top
Todo
Consist Top
Change Facing
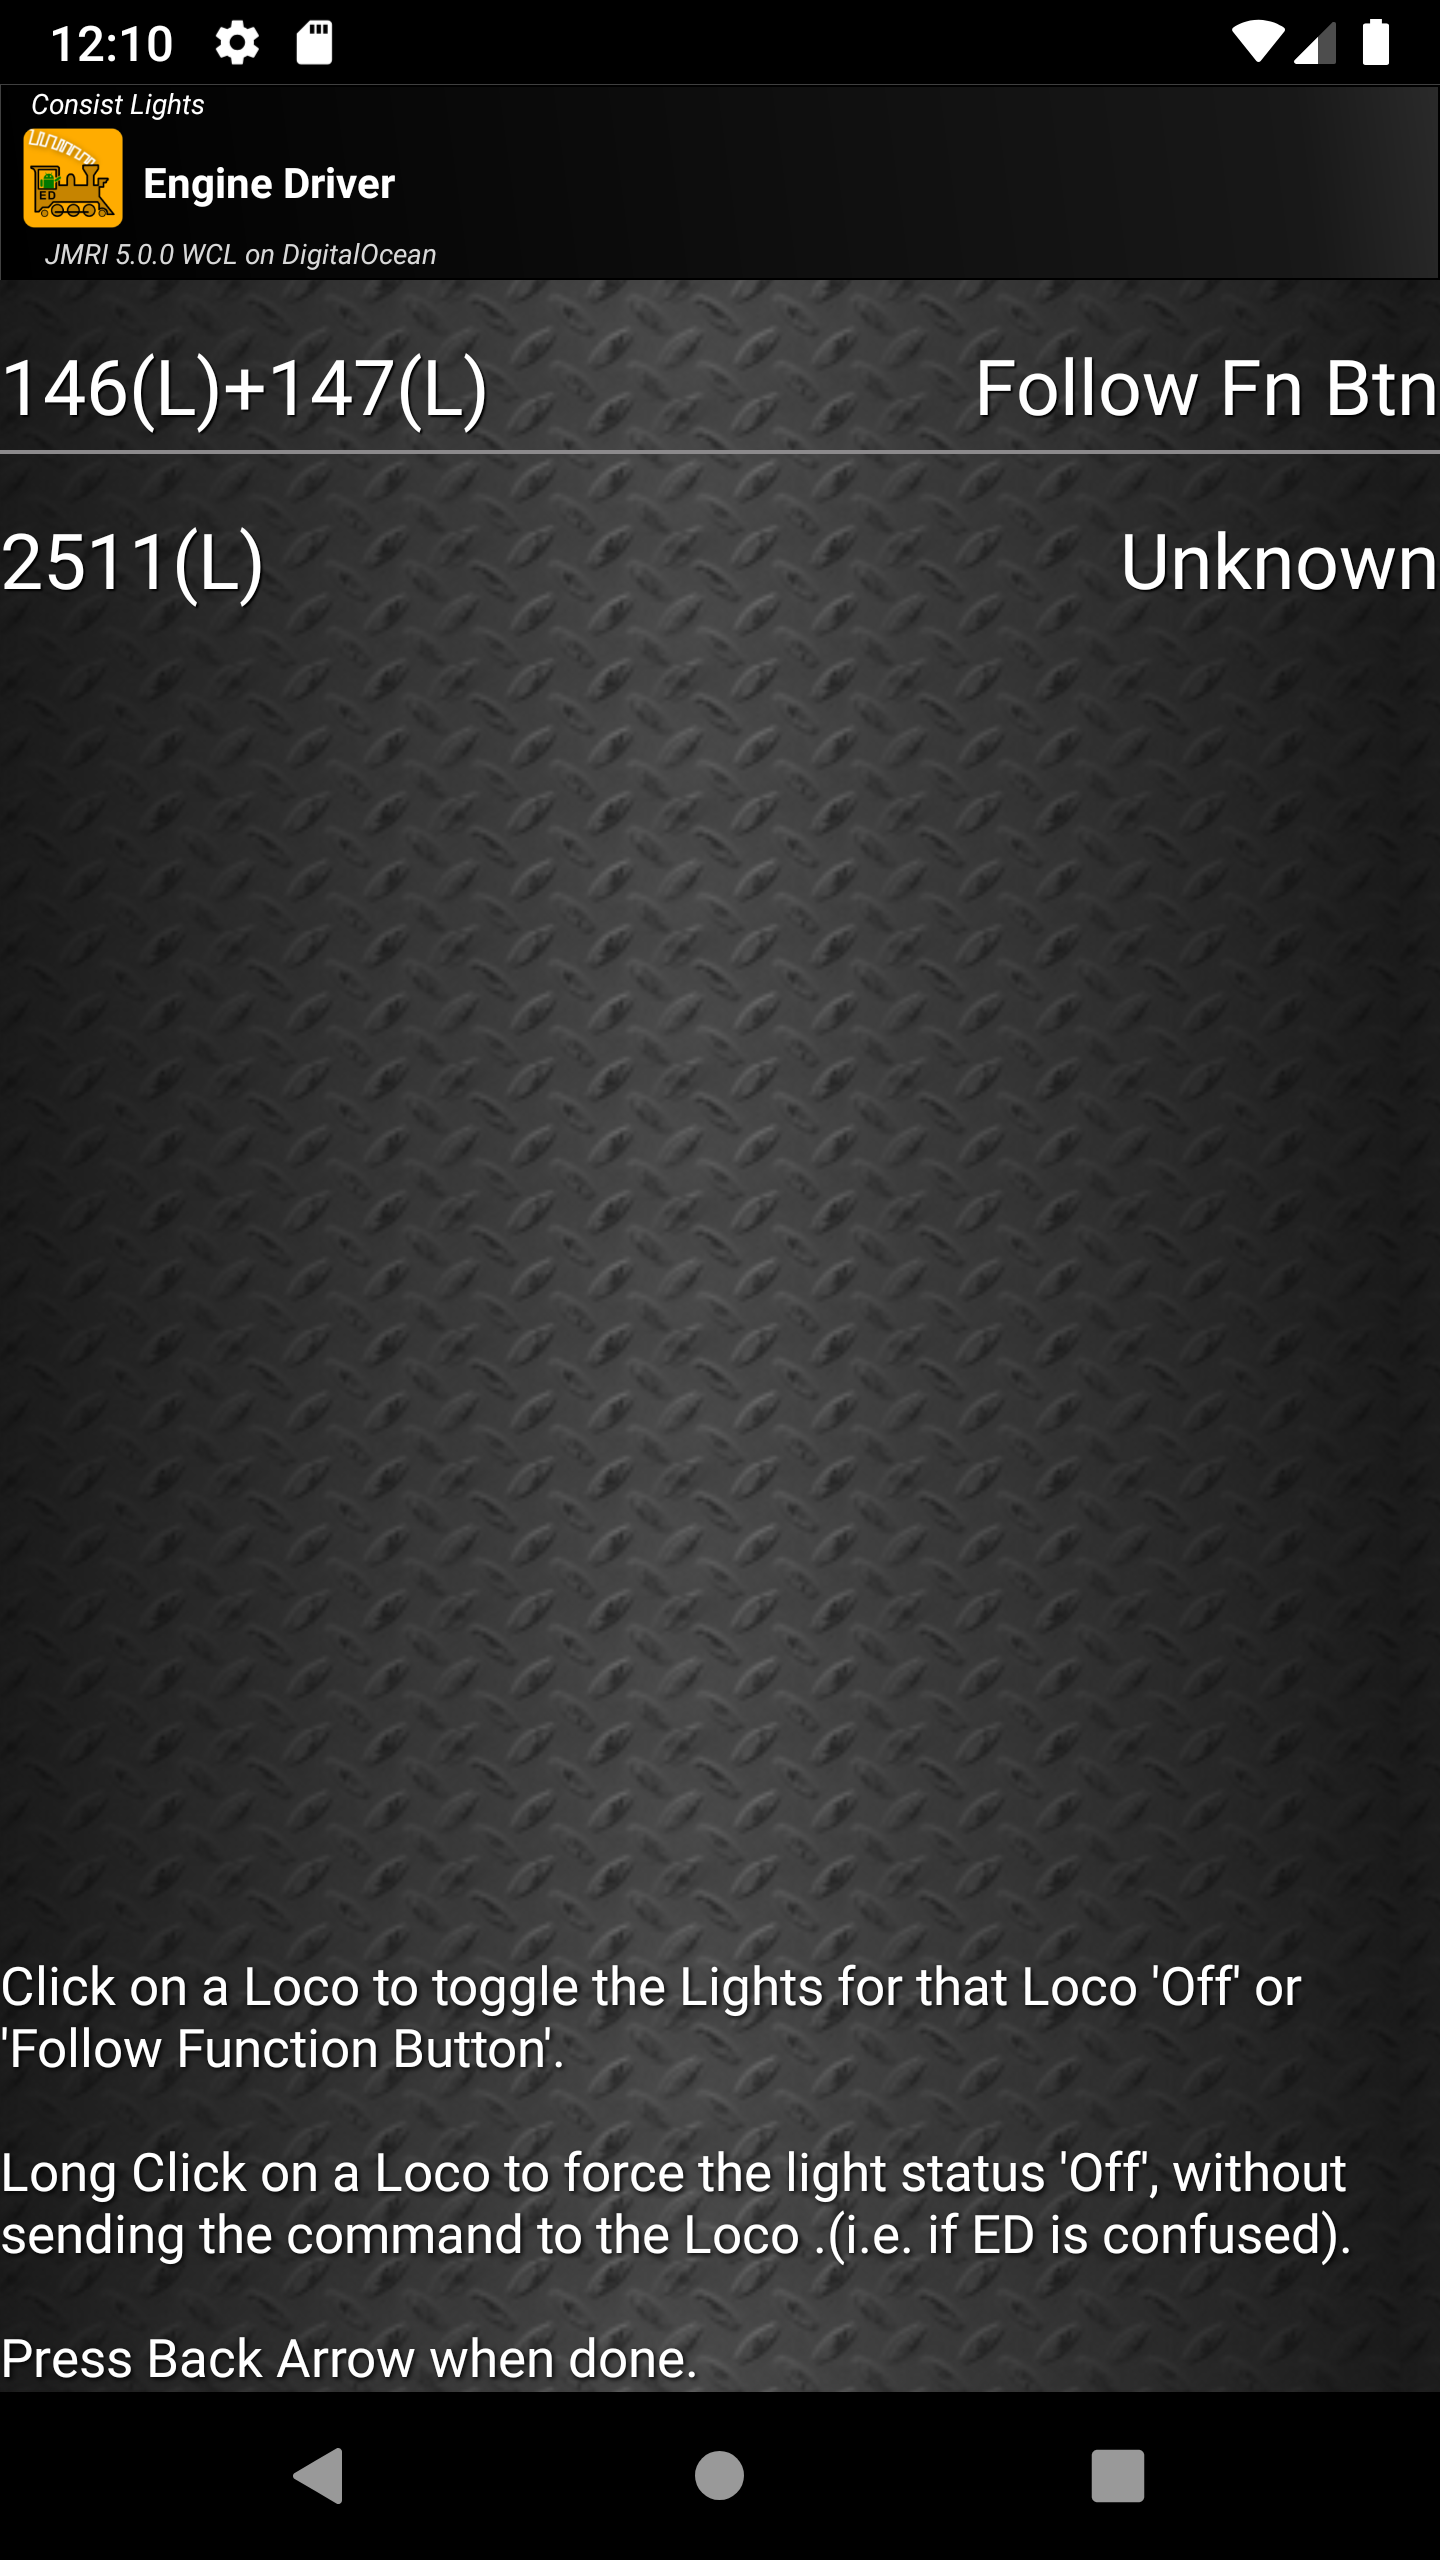
Consist Lights Edit Screen
Todo
Consist Lights Edit Screen
Unknown
Follow Fn Btn
Off
Power Screen
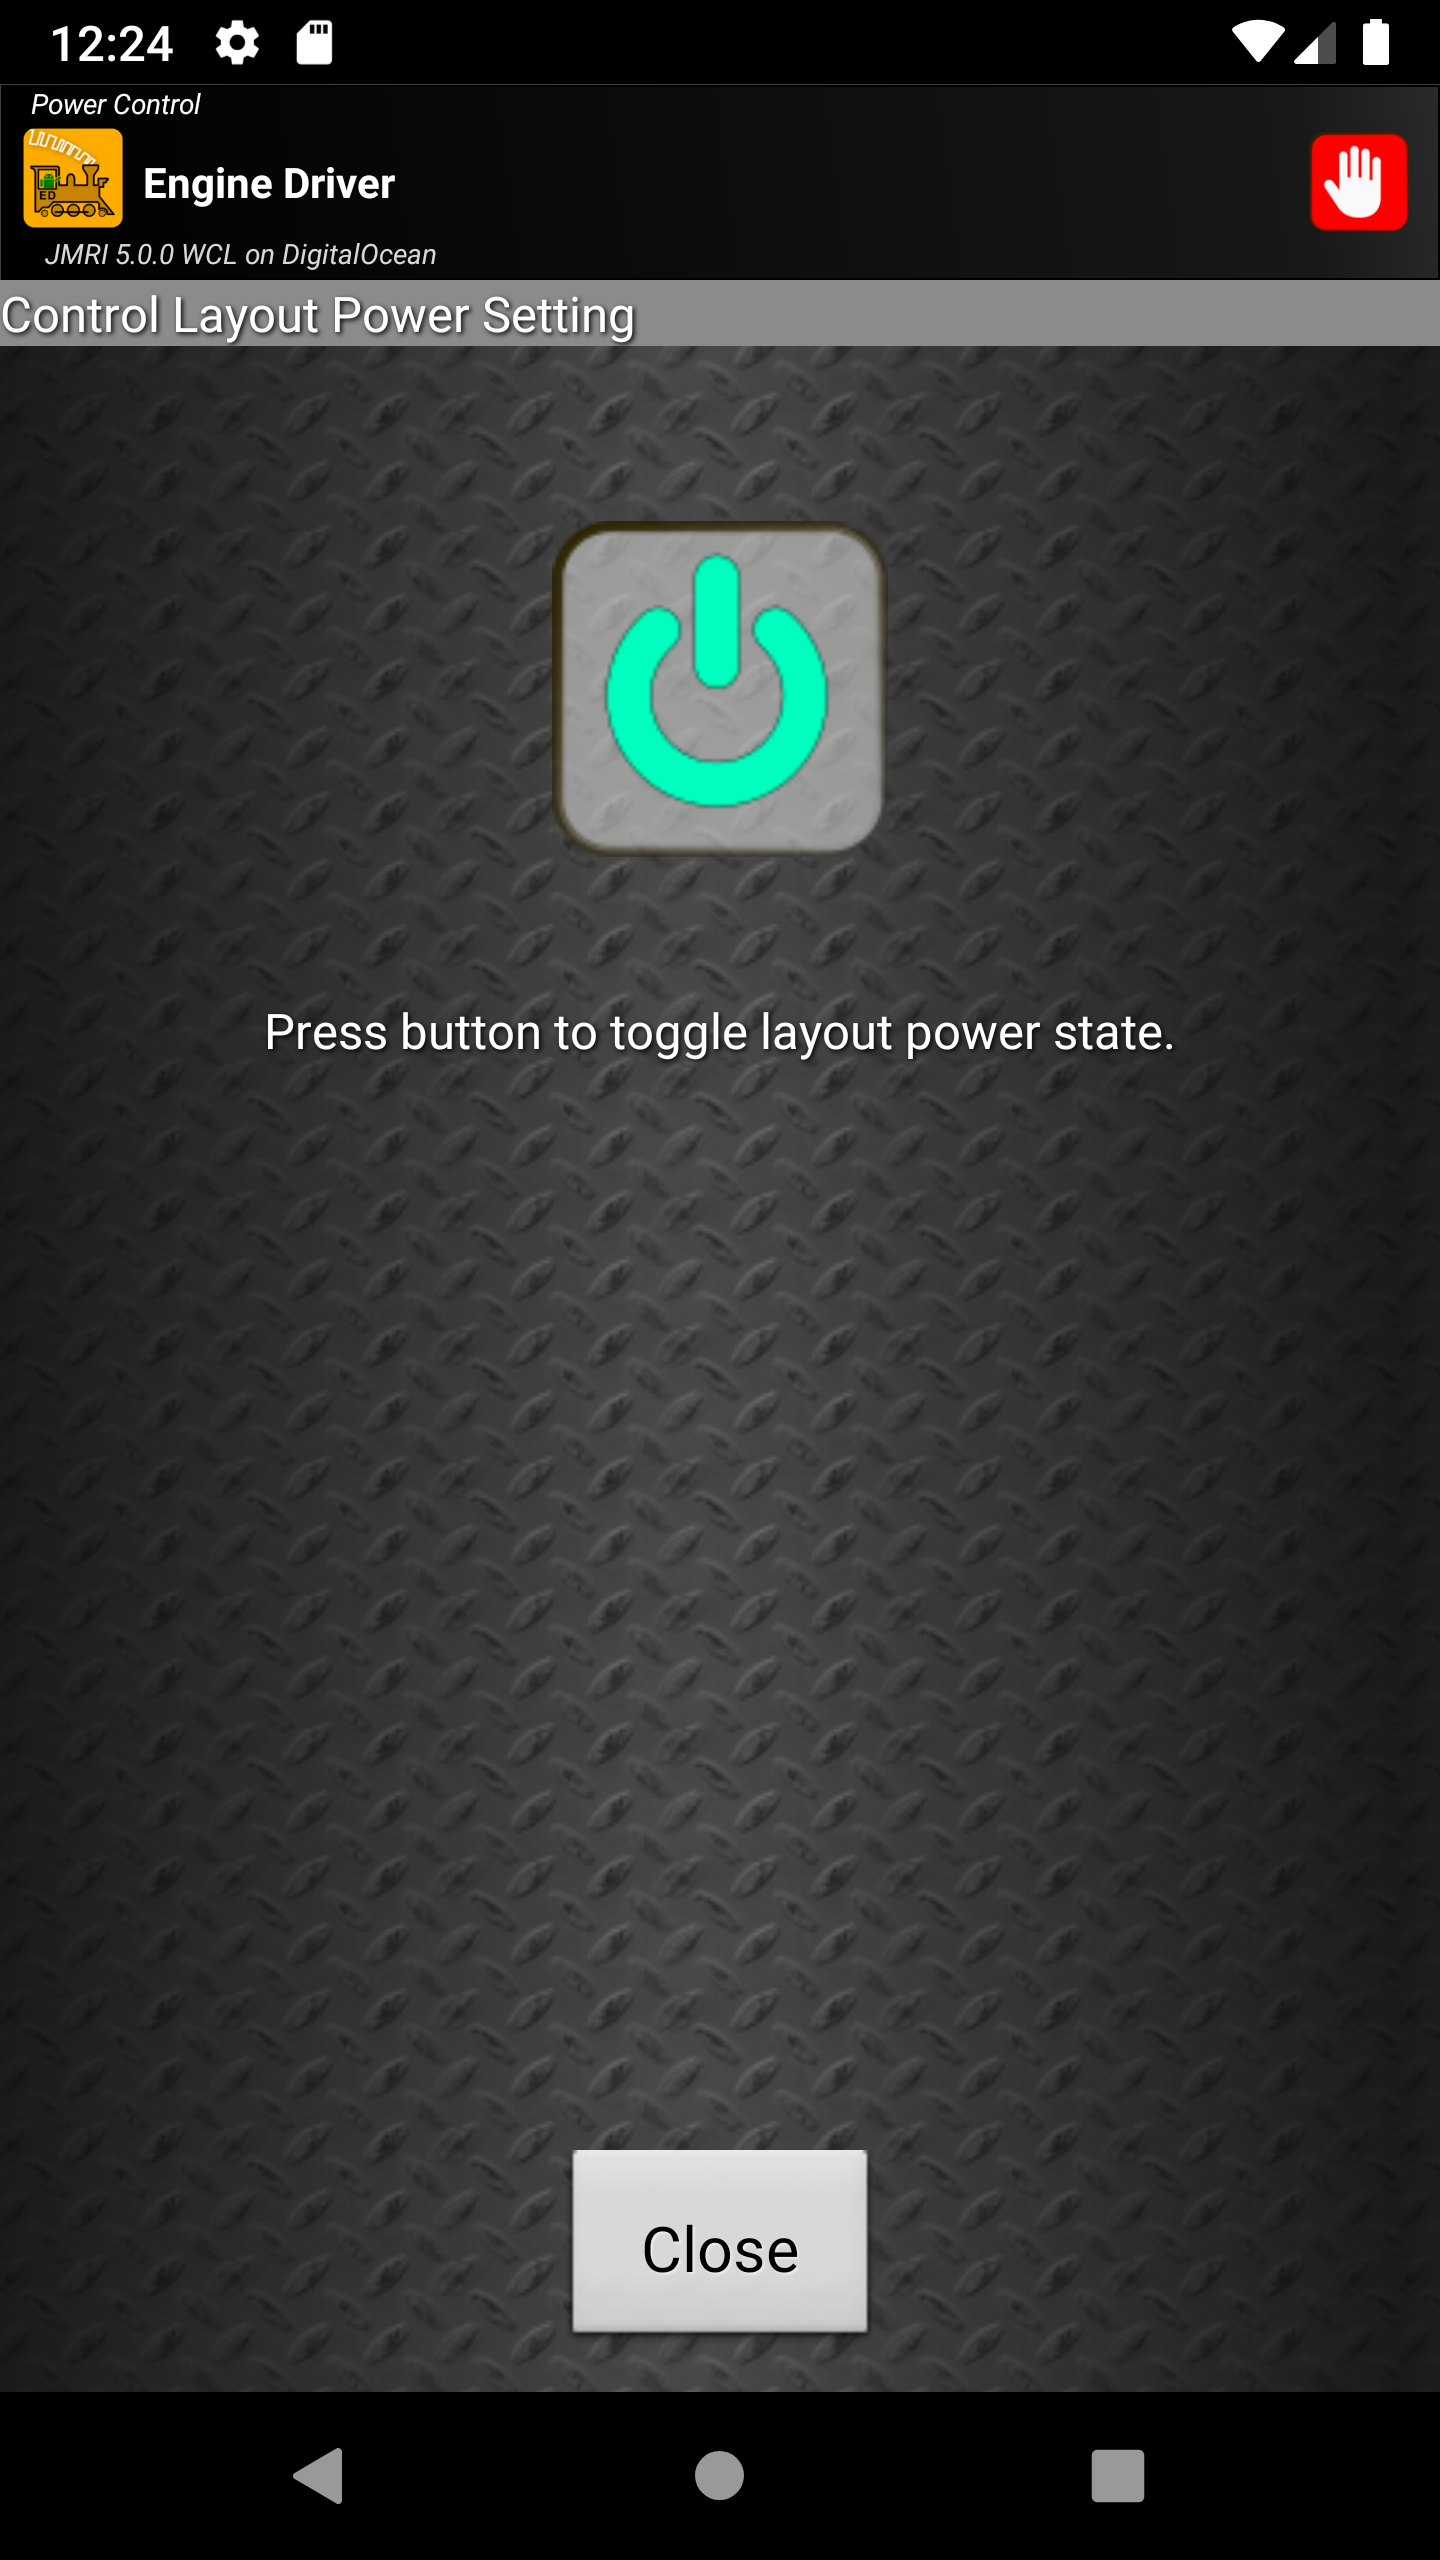
Accessed from any of the main screen via : or from the Action Bar if enabled with the Layout Power button? preference : .
This screen allows you to toggle the state of track power to your layout.
When the button is Green, it indicates that track power is ‘On’.
When the button is Red, it indicates that track power is ‘Off’.
When the button is Amber, it indicates that track power state is unknown.
Pressing a Green button will cause the button to be changed to Red and the track power will be turned ‘Off’.
Pressing a Red button or Amber button will cause the button to be changed to Green and the track power will be turned ‘On’.
Preferences Screen
Accessed from any of the main screens via .
This screen allows you to personalise Engine Driver for how you want it to use it.
Note
See the Preferences page for details on the preferences that can be set.
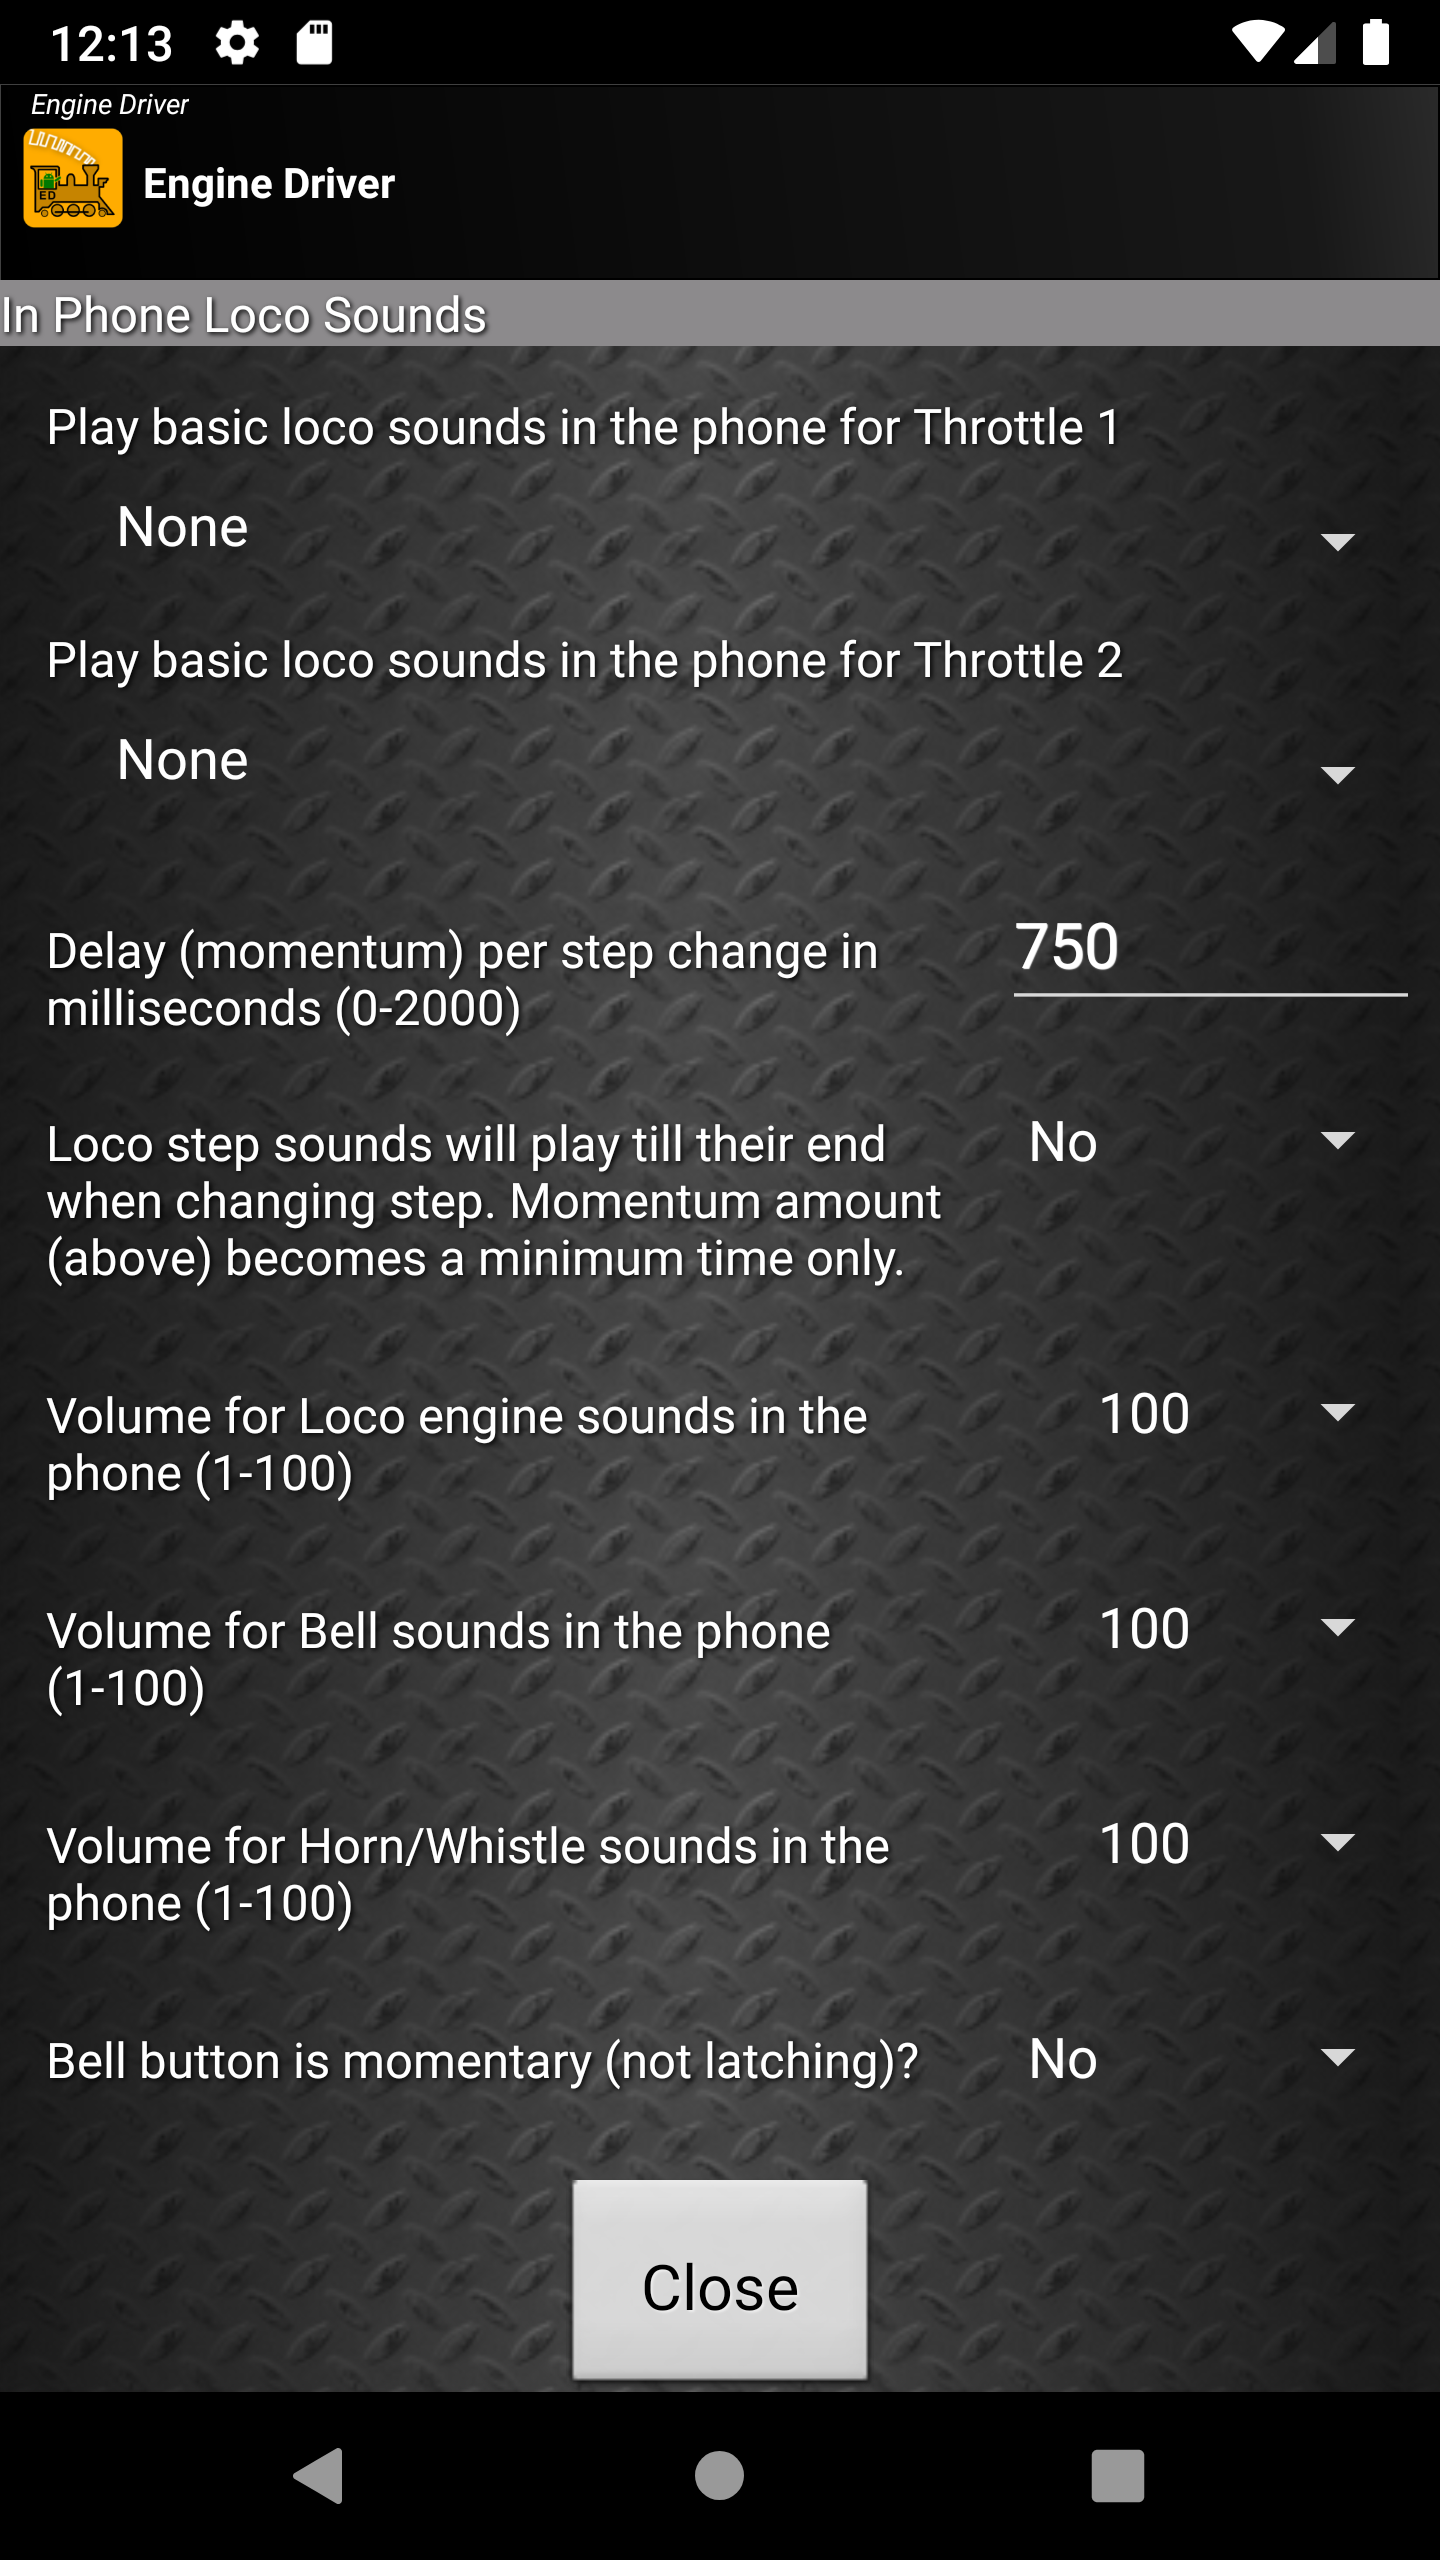
In Phone Loco Sounds Screen
Todo
In Phone Loco Sounds Screen
Accessed from Throttle Screen by the or from the Status Bar if enabled with the In phone sounds button preference.
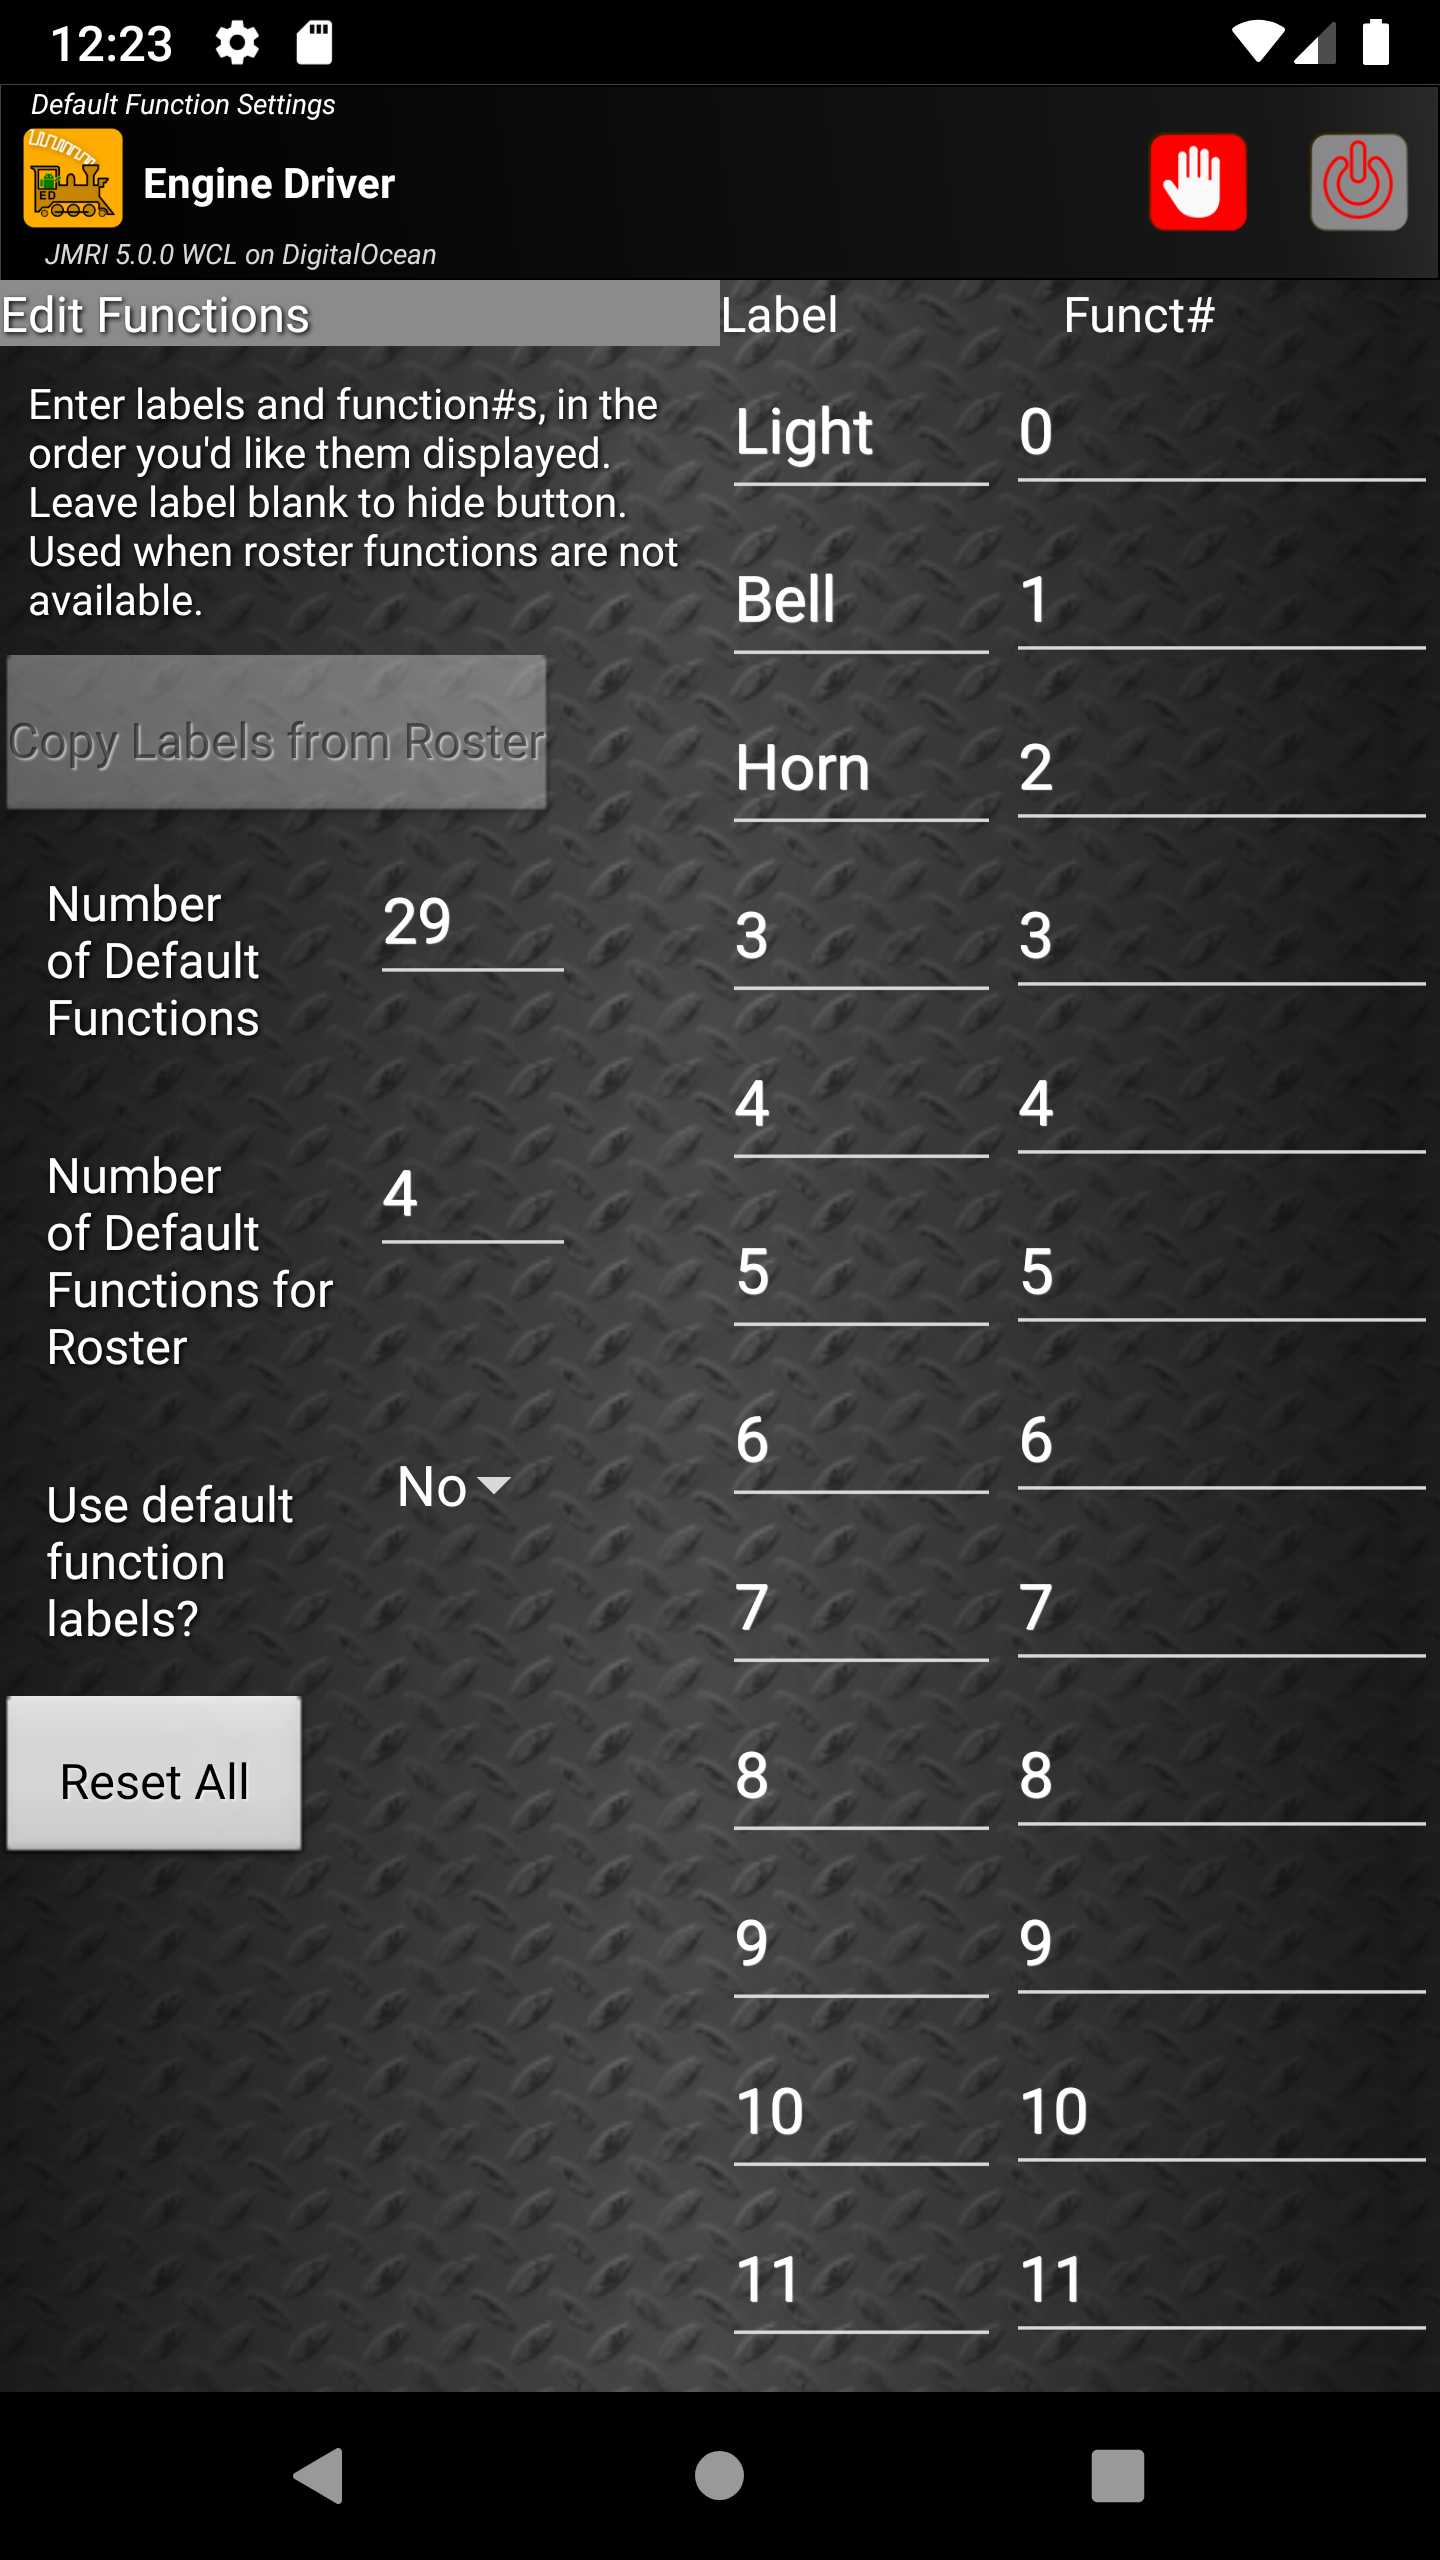
Function Defaults Screen
Todo
Function Defaults Screen
Accessed from the menu on the Throttle Screen as .
DCC-EX Function Settings Screen
Todo
DCC-EX Function Settings Screen
Accessed from the menu on the Throttle Screen as .
DCC-EX Screen
Todo
DCC-EX Screen
Accessed from the menu on the Throttle Screen as .
Gamepad Test Screen
Todo
Gamepad Test Screen
Accessed from the Throttle Screen via the . (where ‘X’ is the number of the gamepad.)
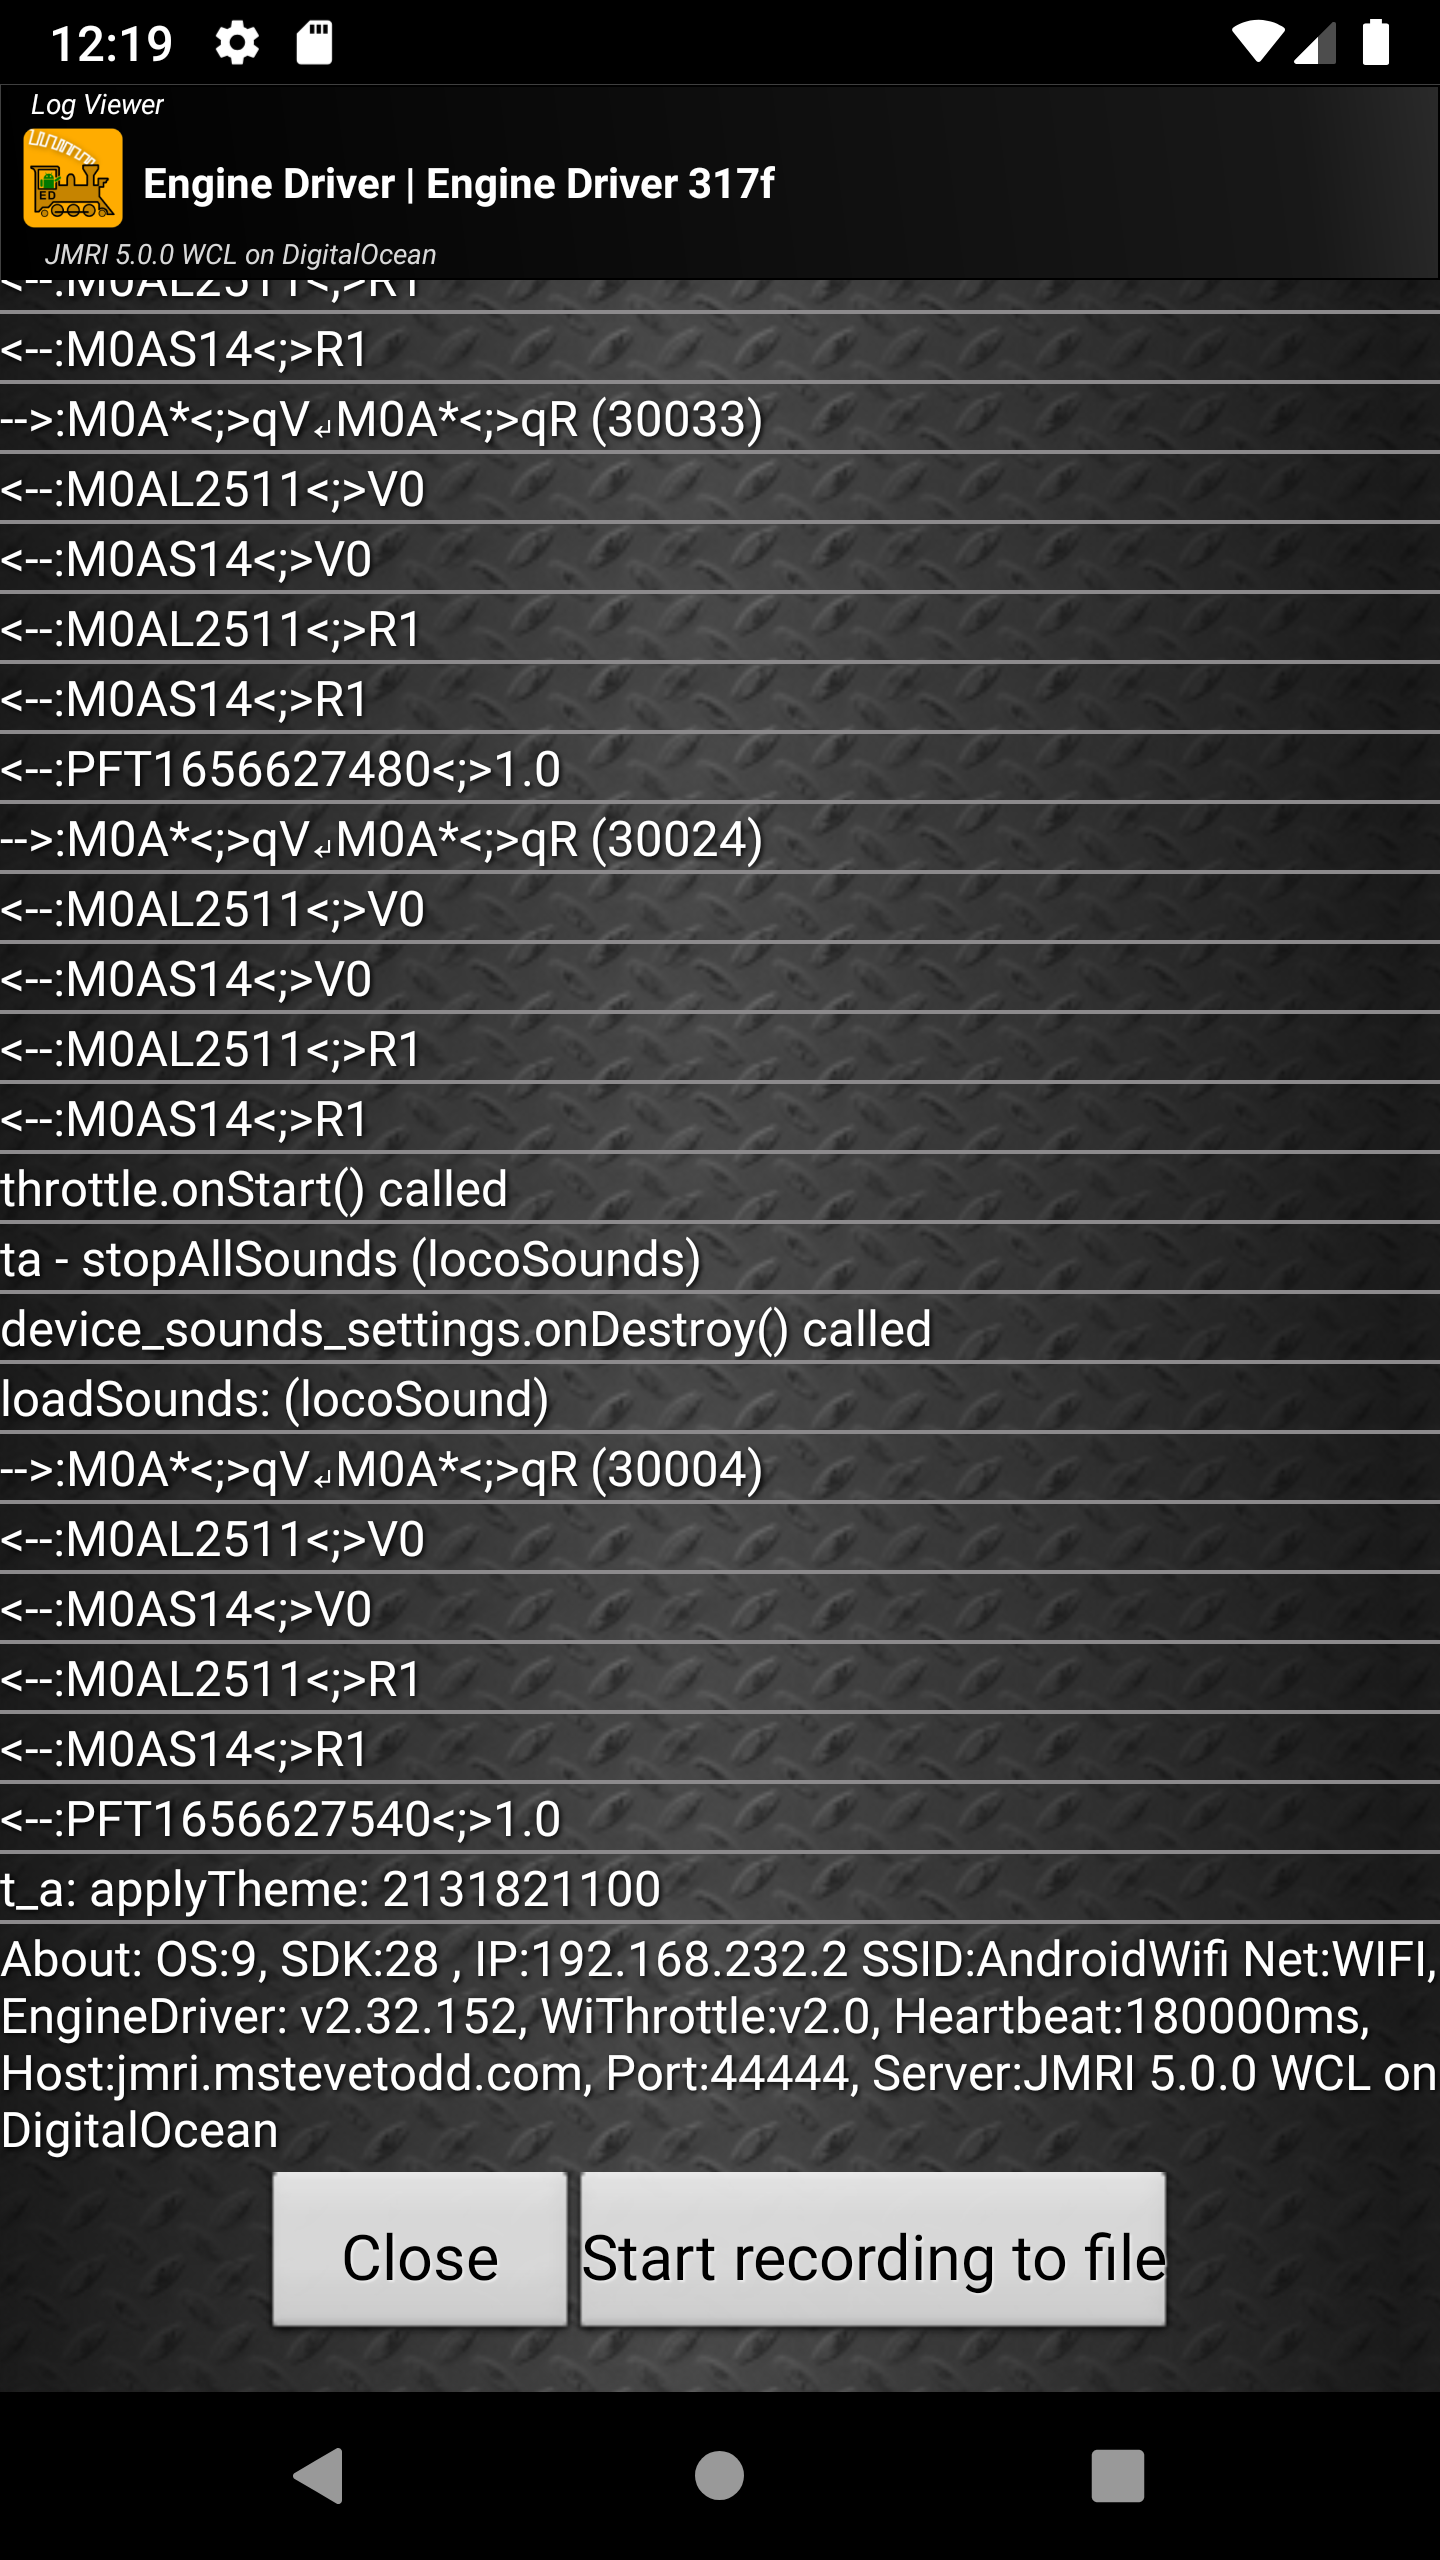
View Log Screen
Todo
View Log Screen
Accessed from any of the main screens via .
This screen allows you to view the internal Engine Driver log of events. This is sometimes useful for analysing problems.
The option to Start recording to file creates a user-accessible file that can be sent to the Engine Driver app developers or the Groups.io help group to assist you in resolving a problem.
The file will be located on your mobile phone at:
Internal storage /Android/data/jmri.enginedriver/files
and will be named something like: logcat9999999999999.txt
Enable the ??? preference to include the timestamp on each line of the log.
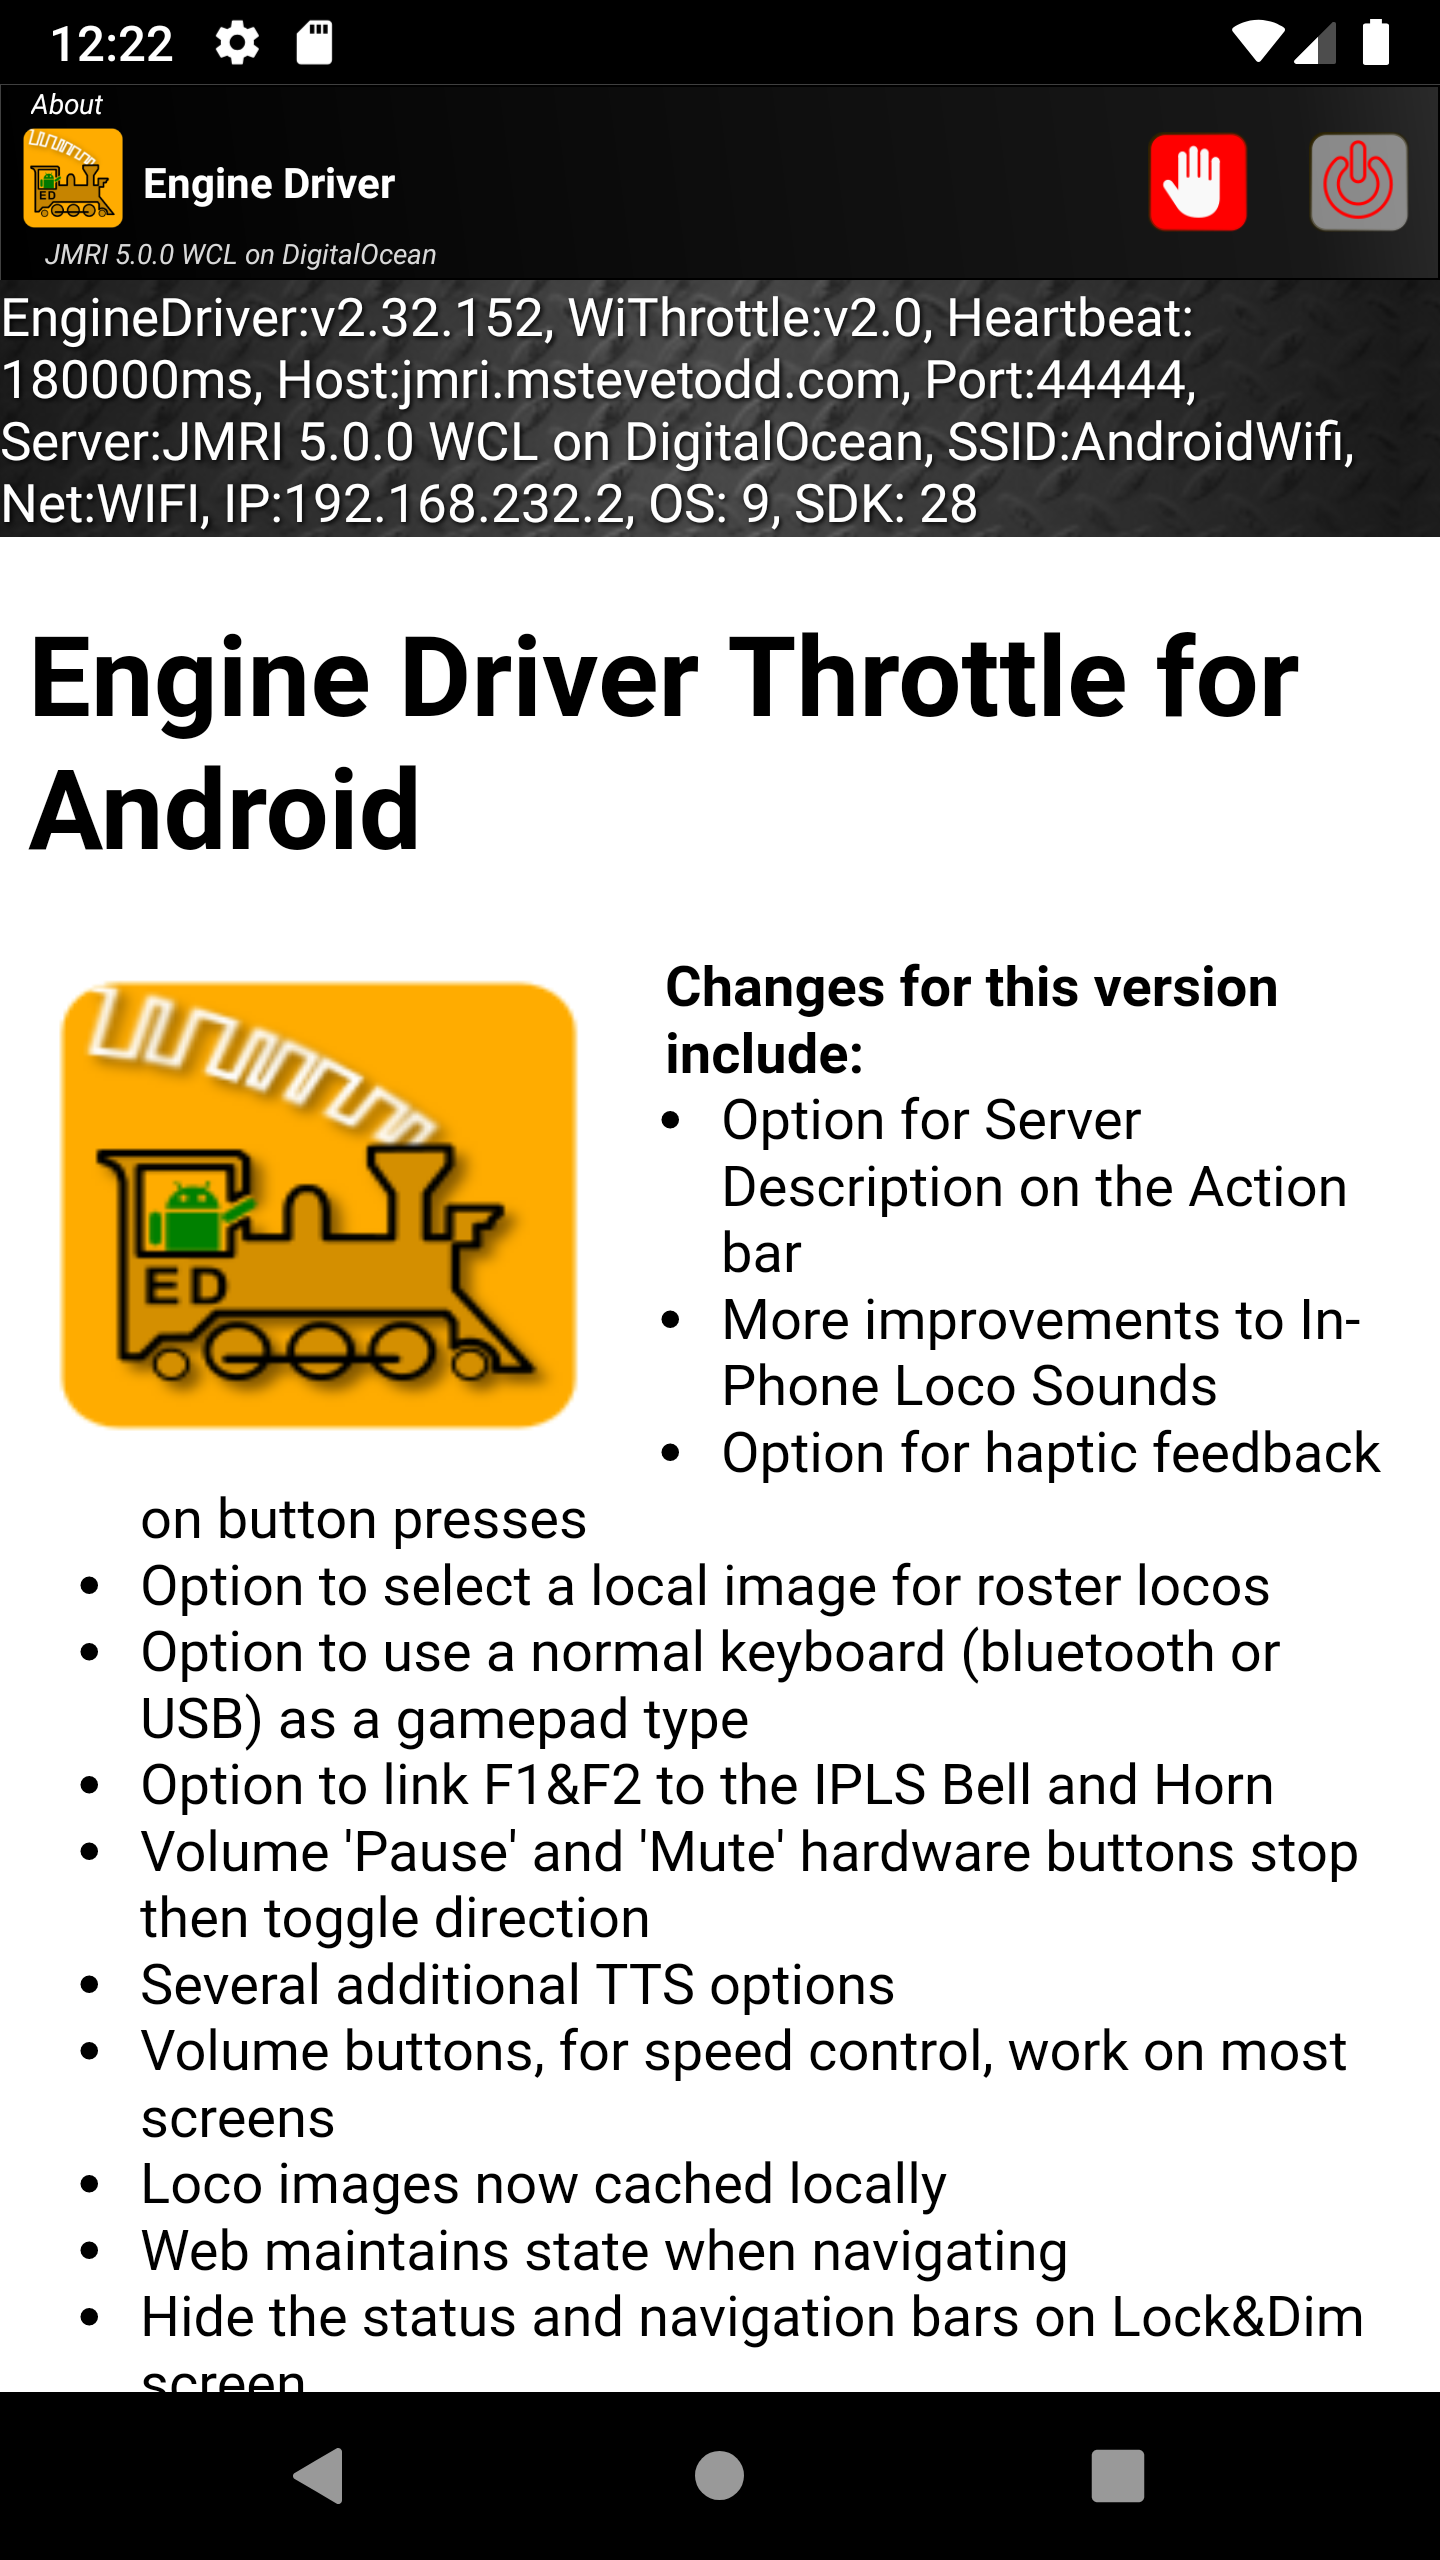
About Screen
Todo
About Screen
This screen displays
Information about Engine Driver
Information about the WiThrottle Server it is currently connected to (if any)
A page of basic information about Engine Driver
Reconnecting Screen
This screen displays if Engine Driver has not been able to communicate with the WiThrottle Server within a specified time.
Todo
Reconnecting Screen
Common Elements and Features
This section describes some of the elements and features that appear throughout or affect the entire Engine Driver app.
Overflow Menu (the Menu)
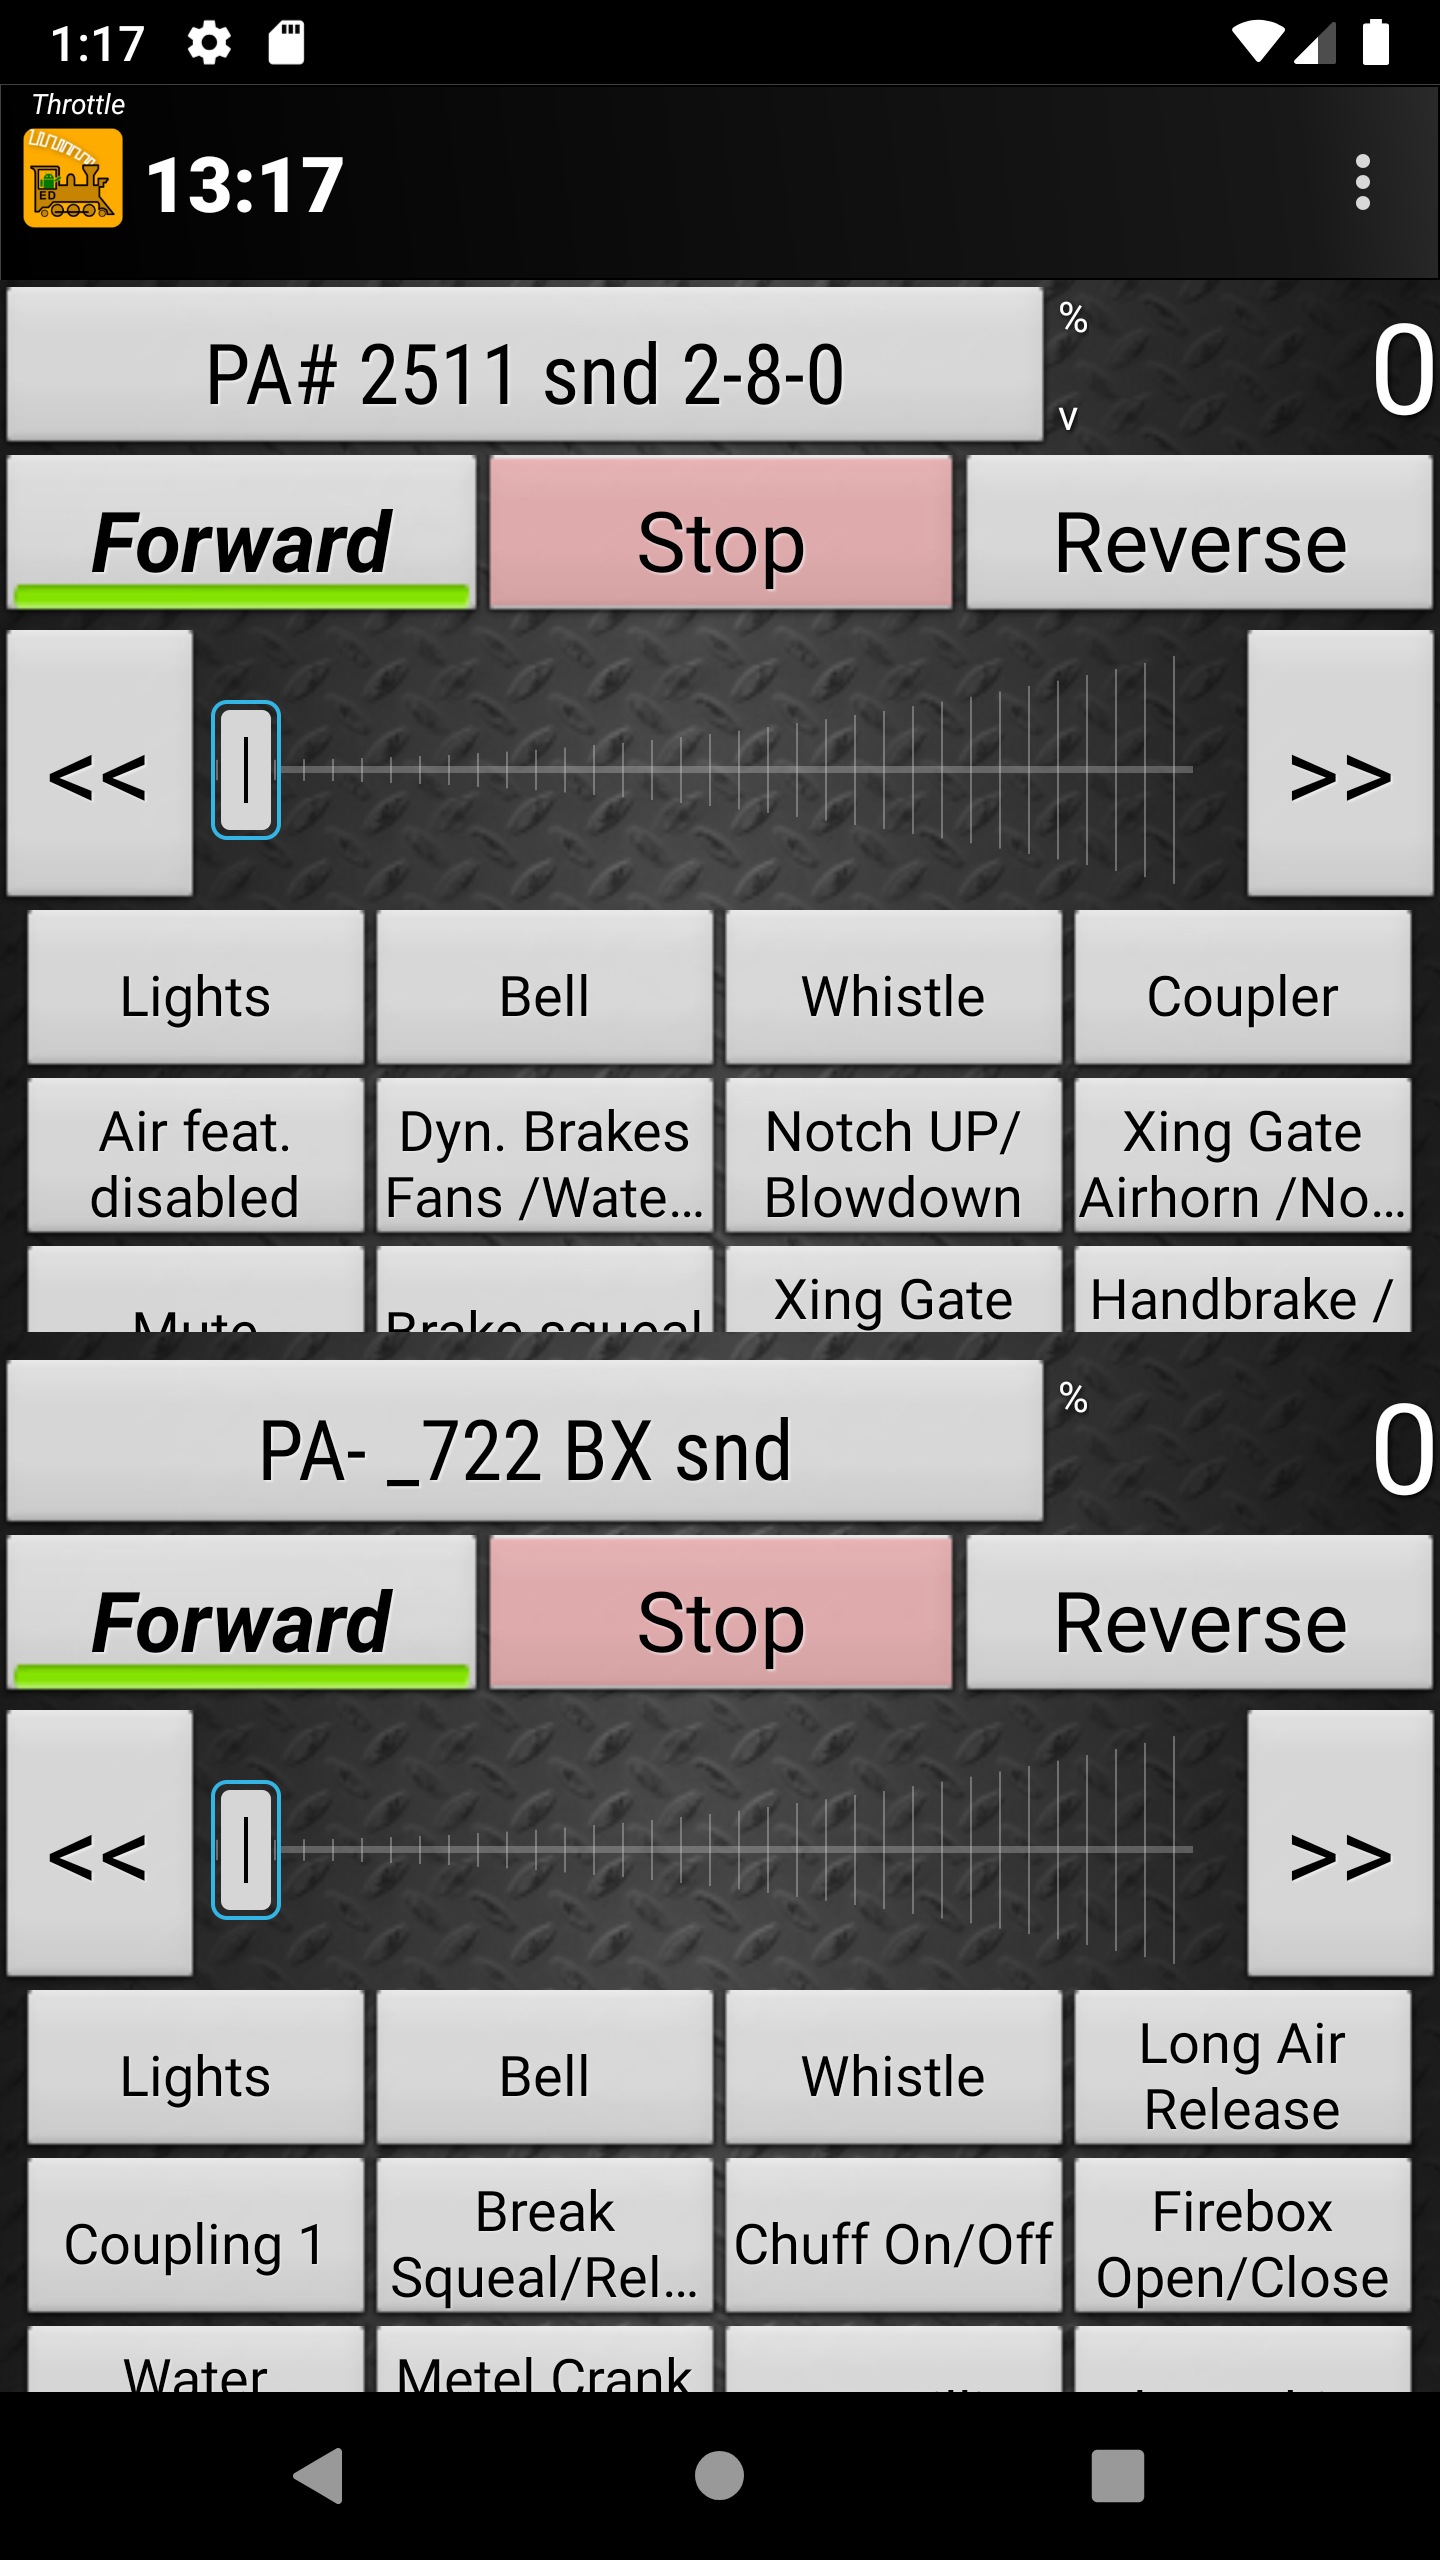
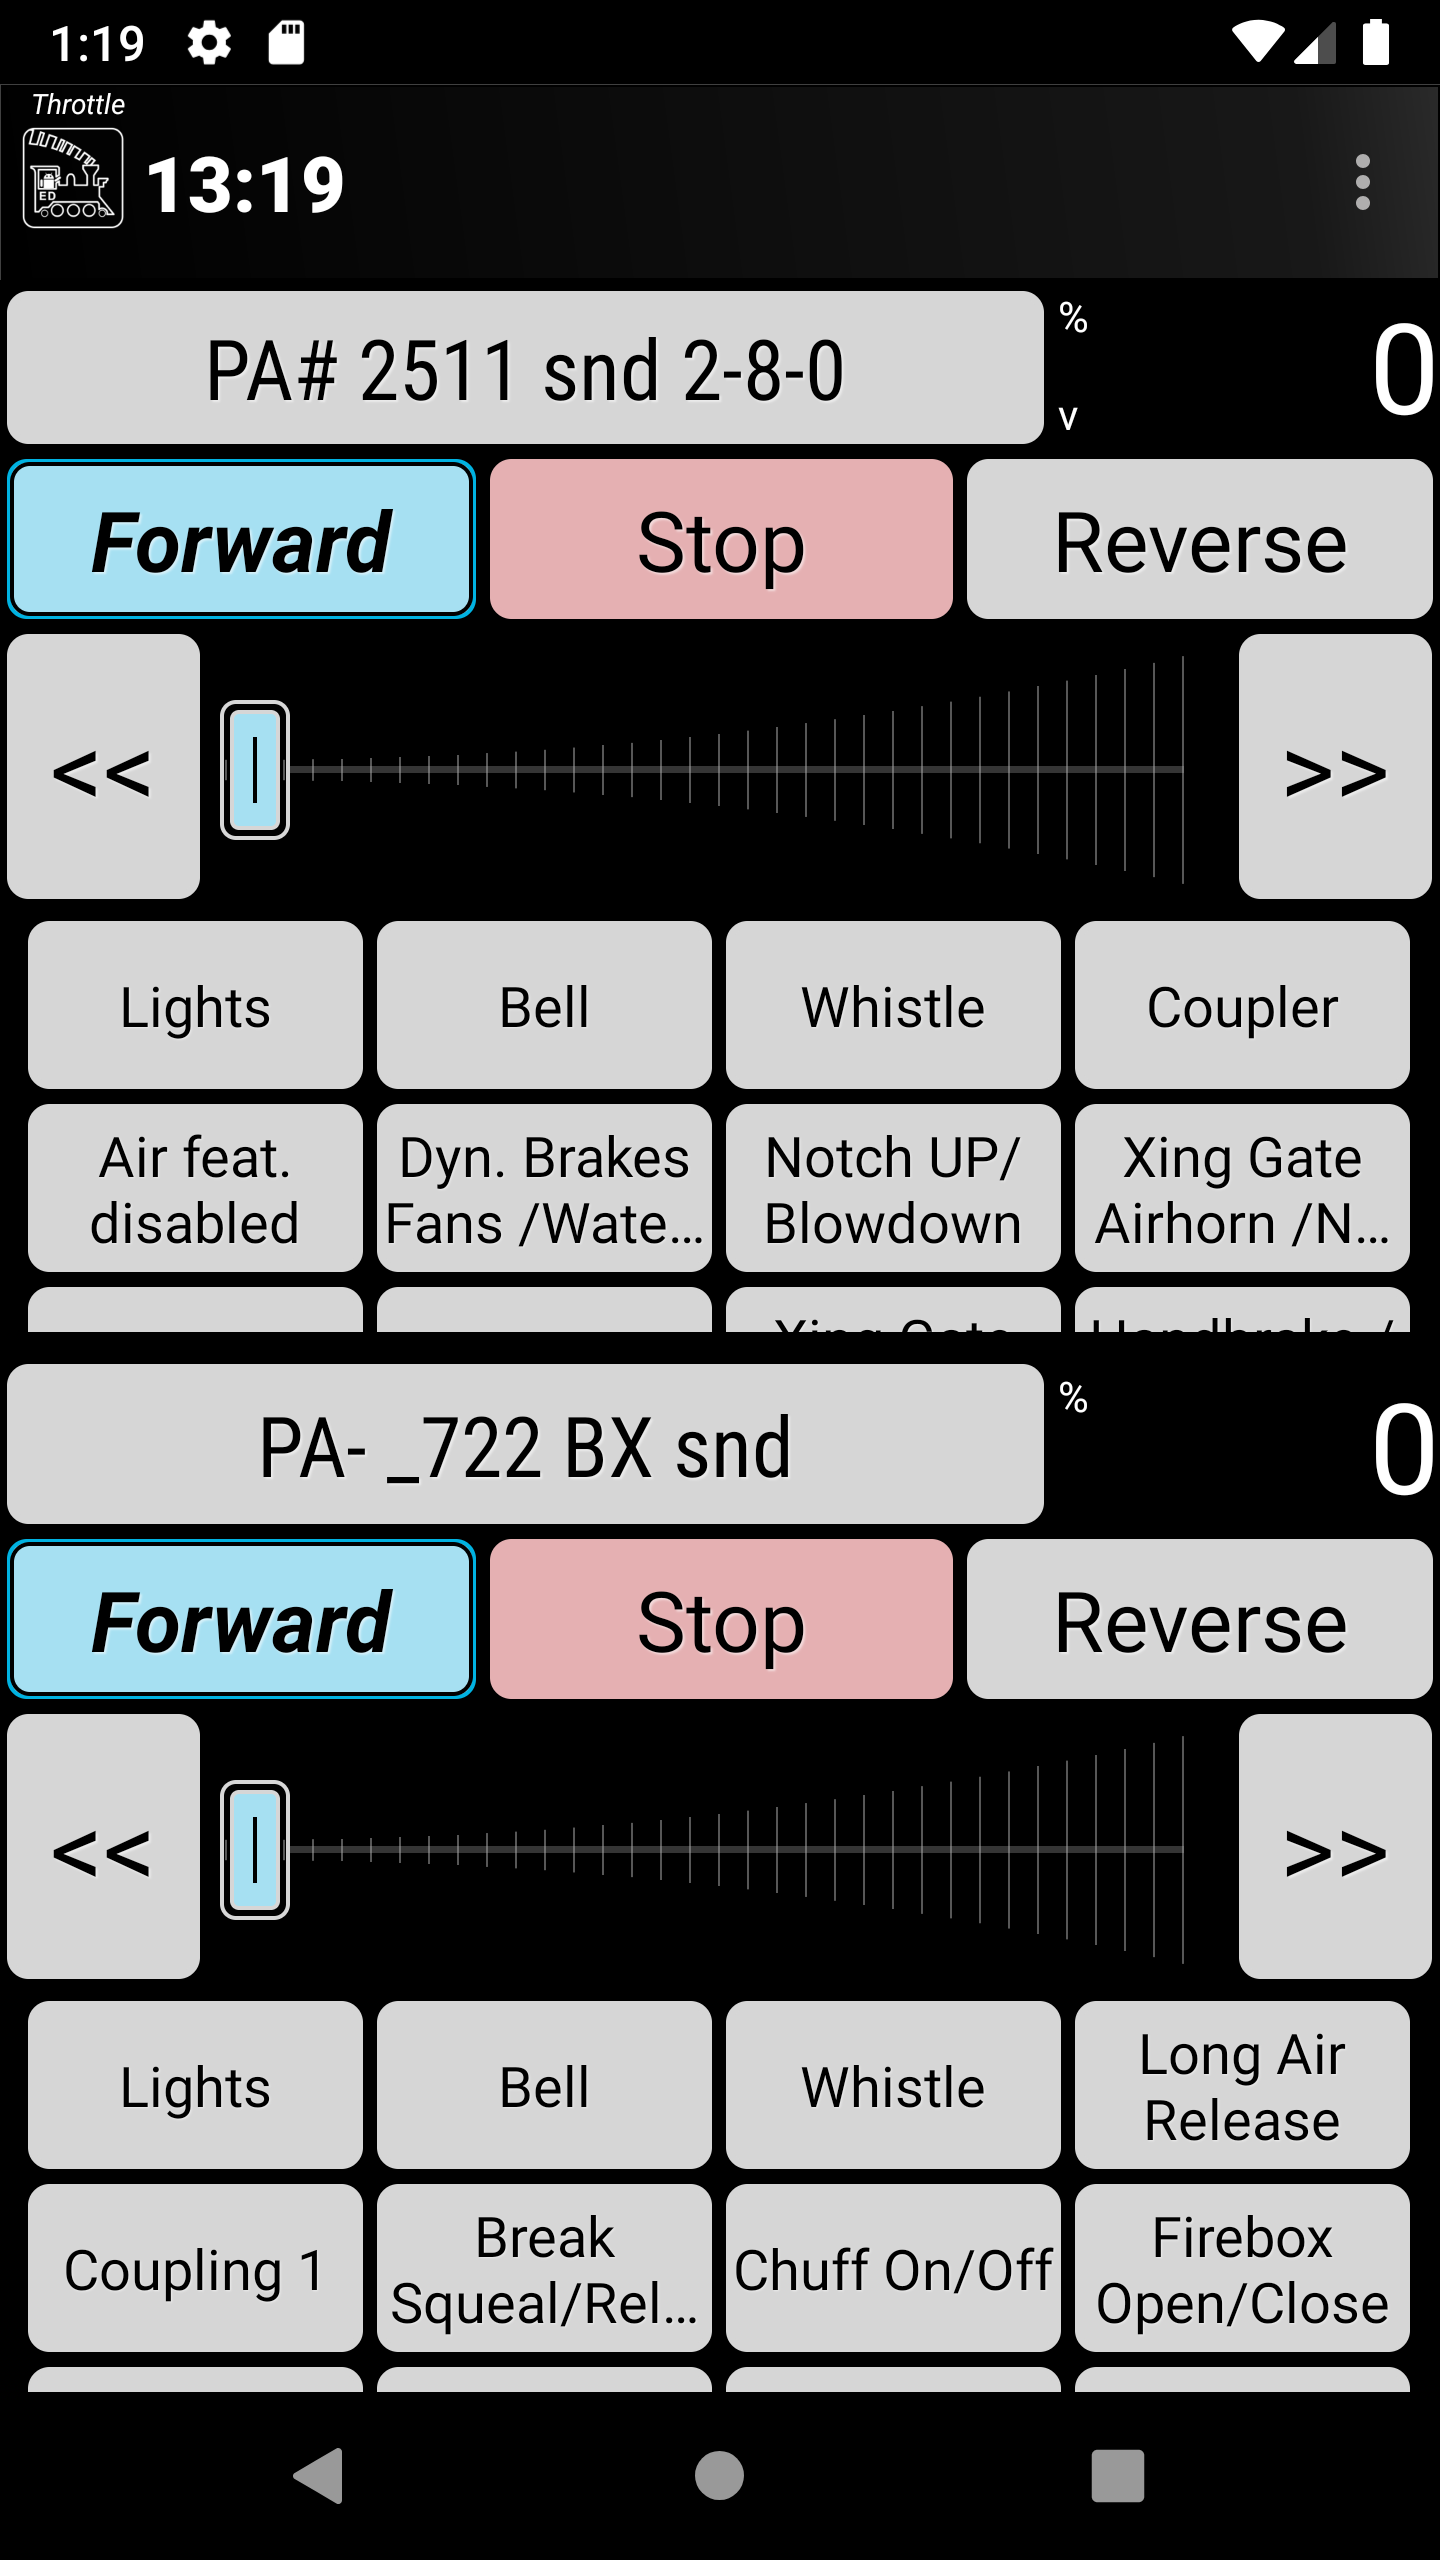
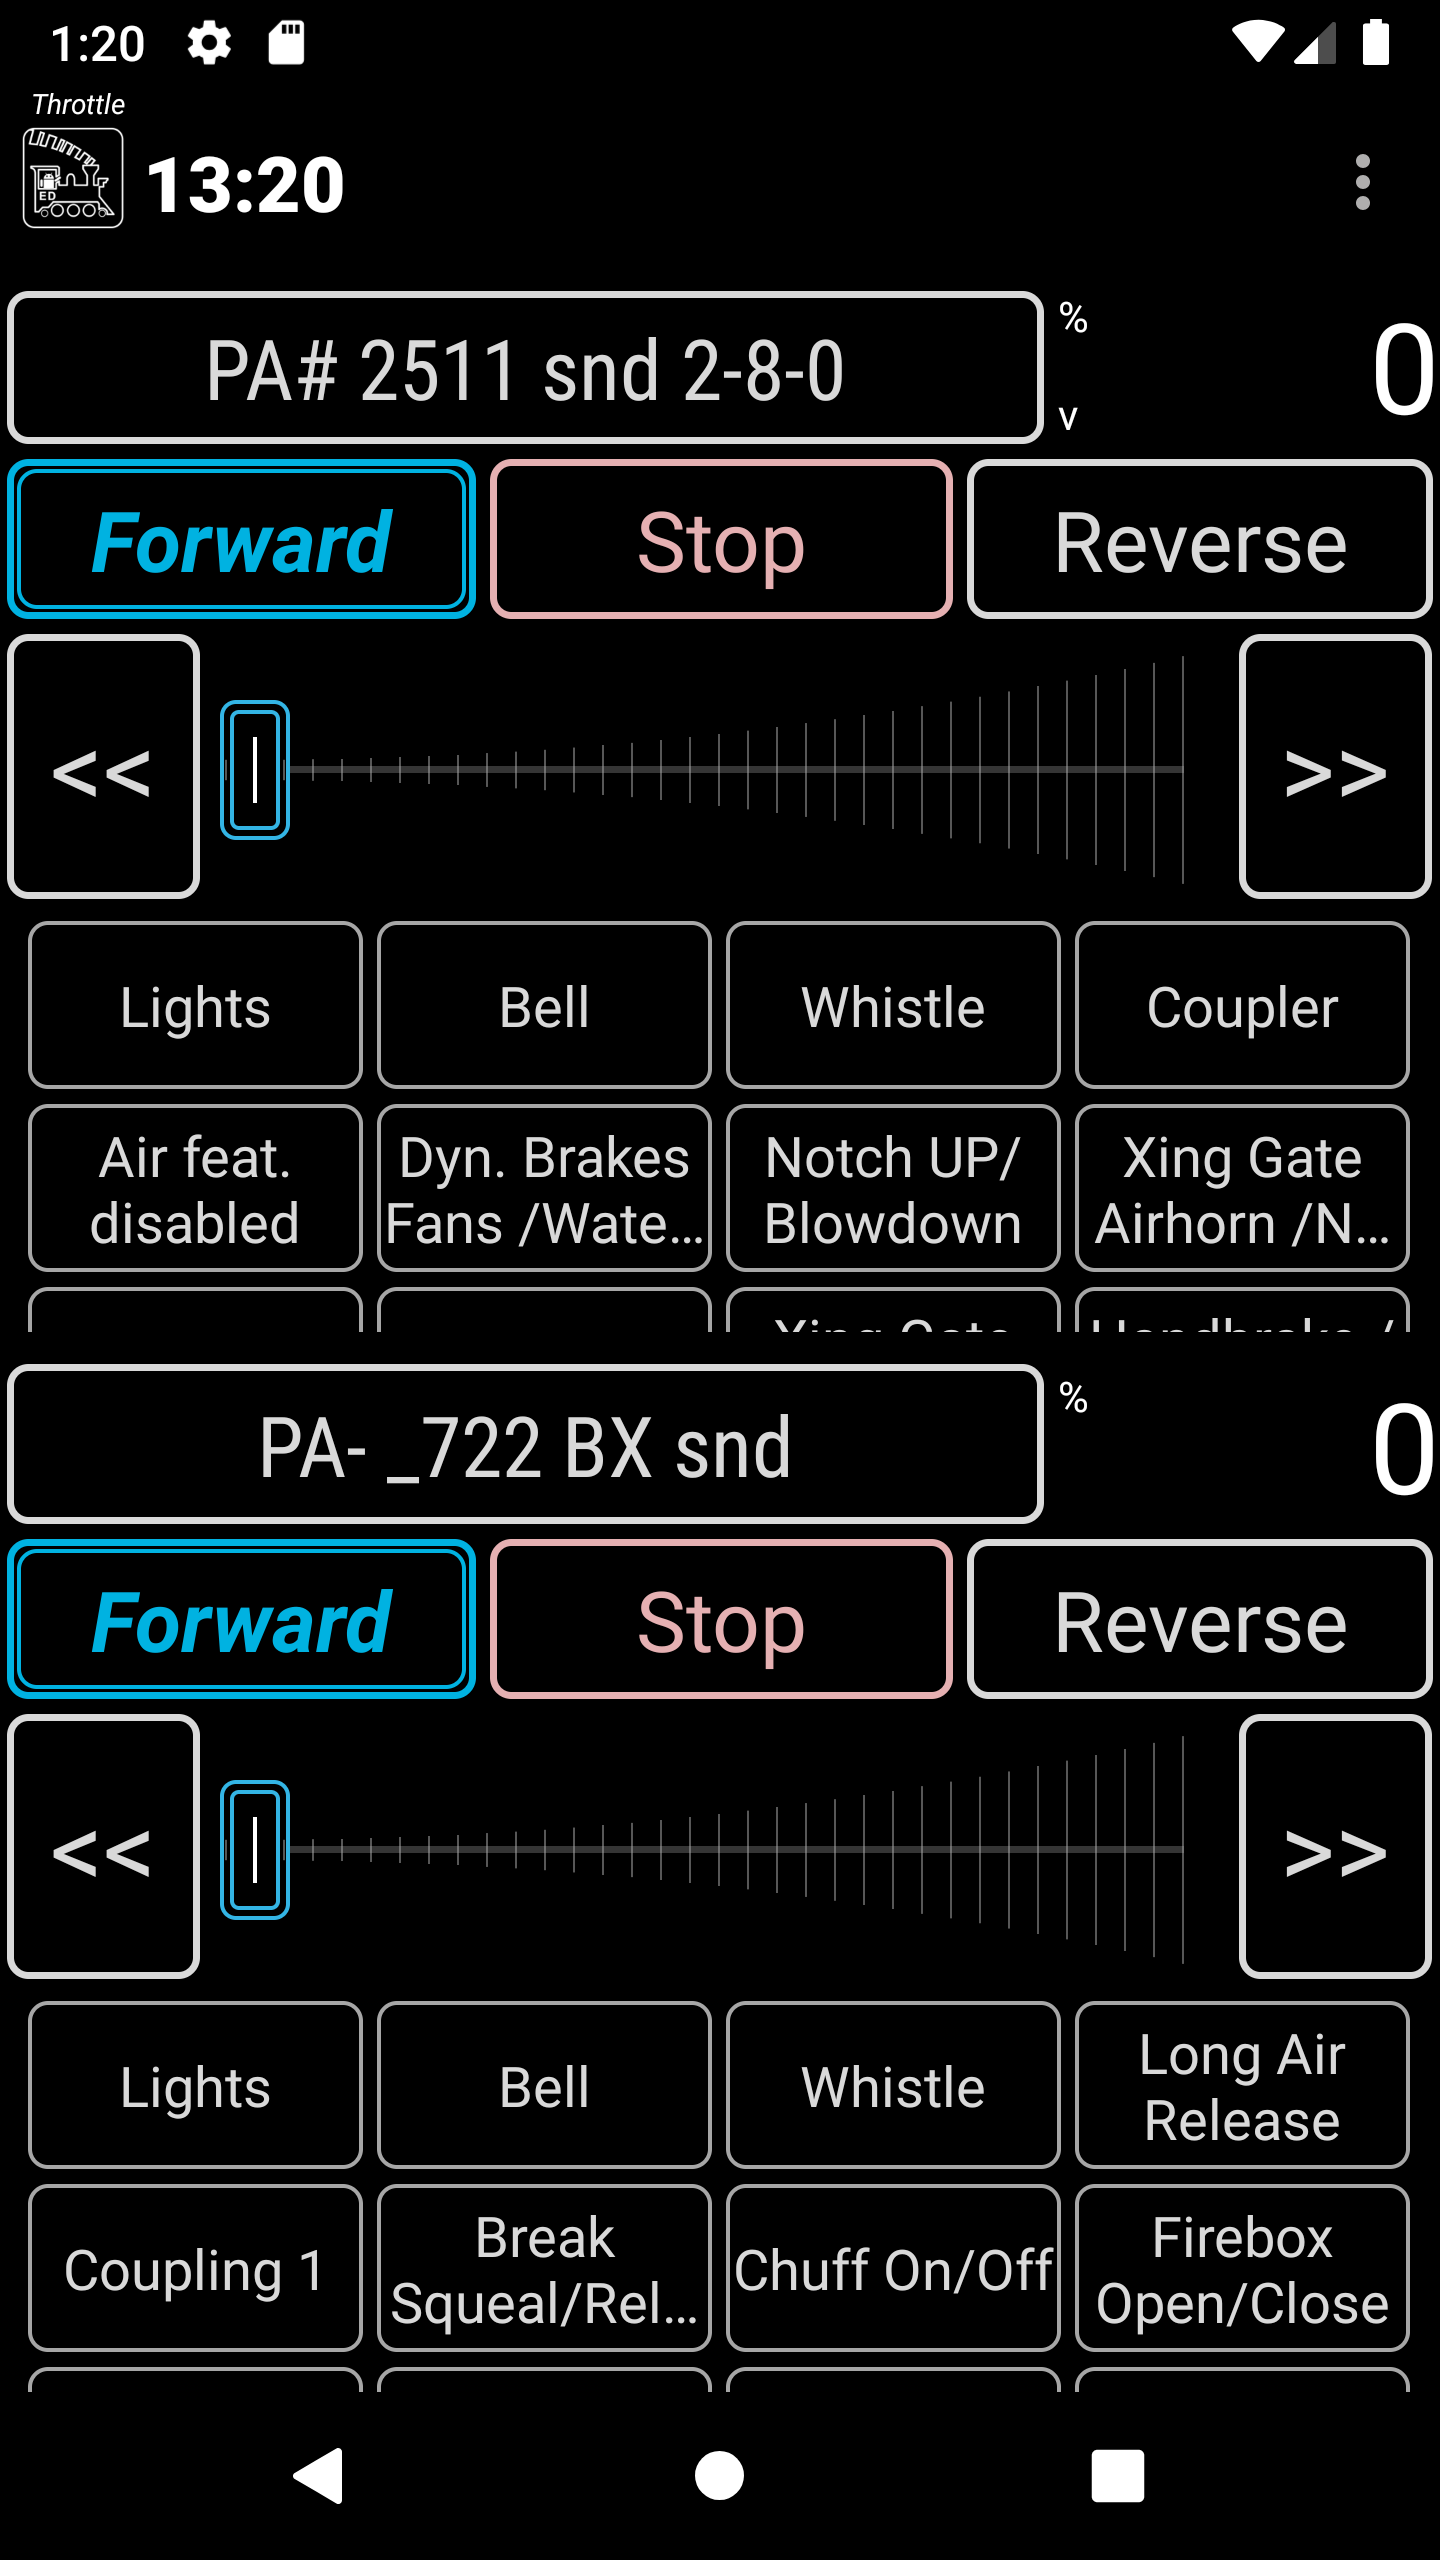
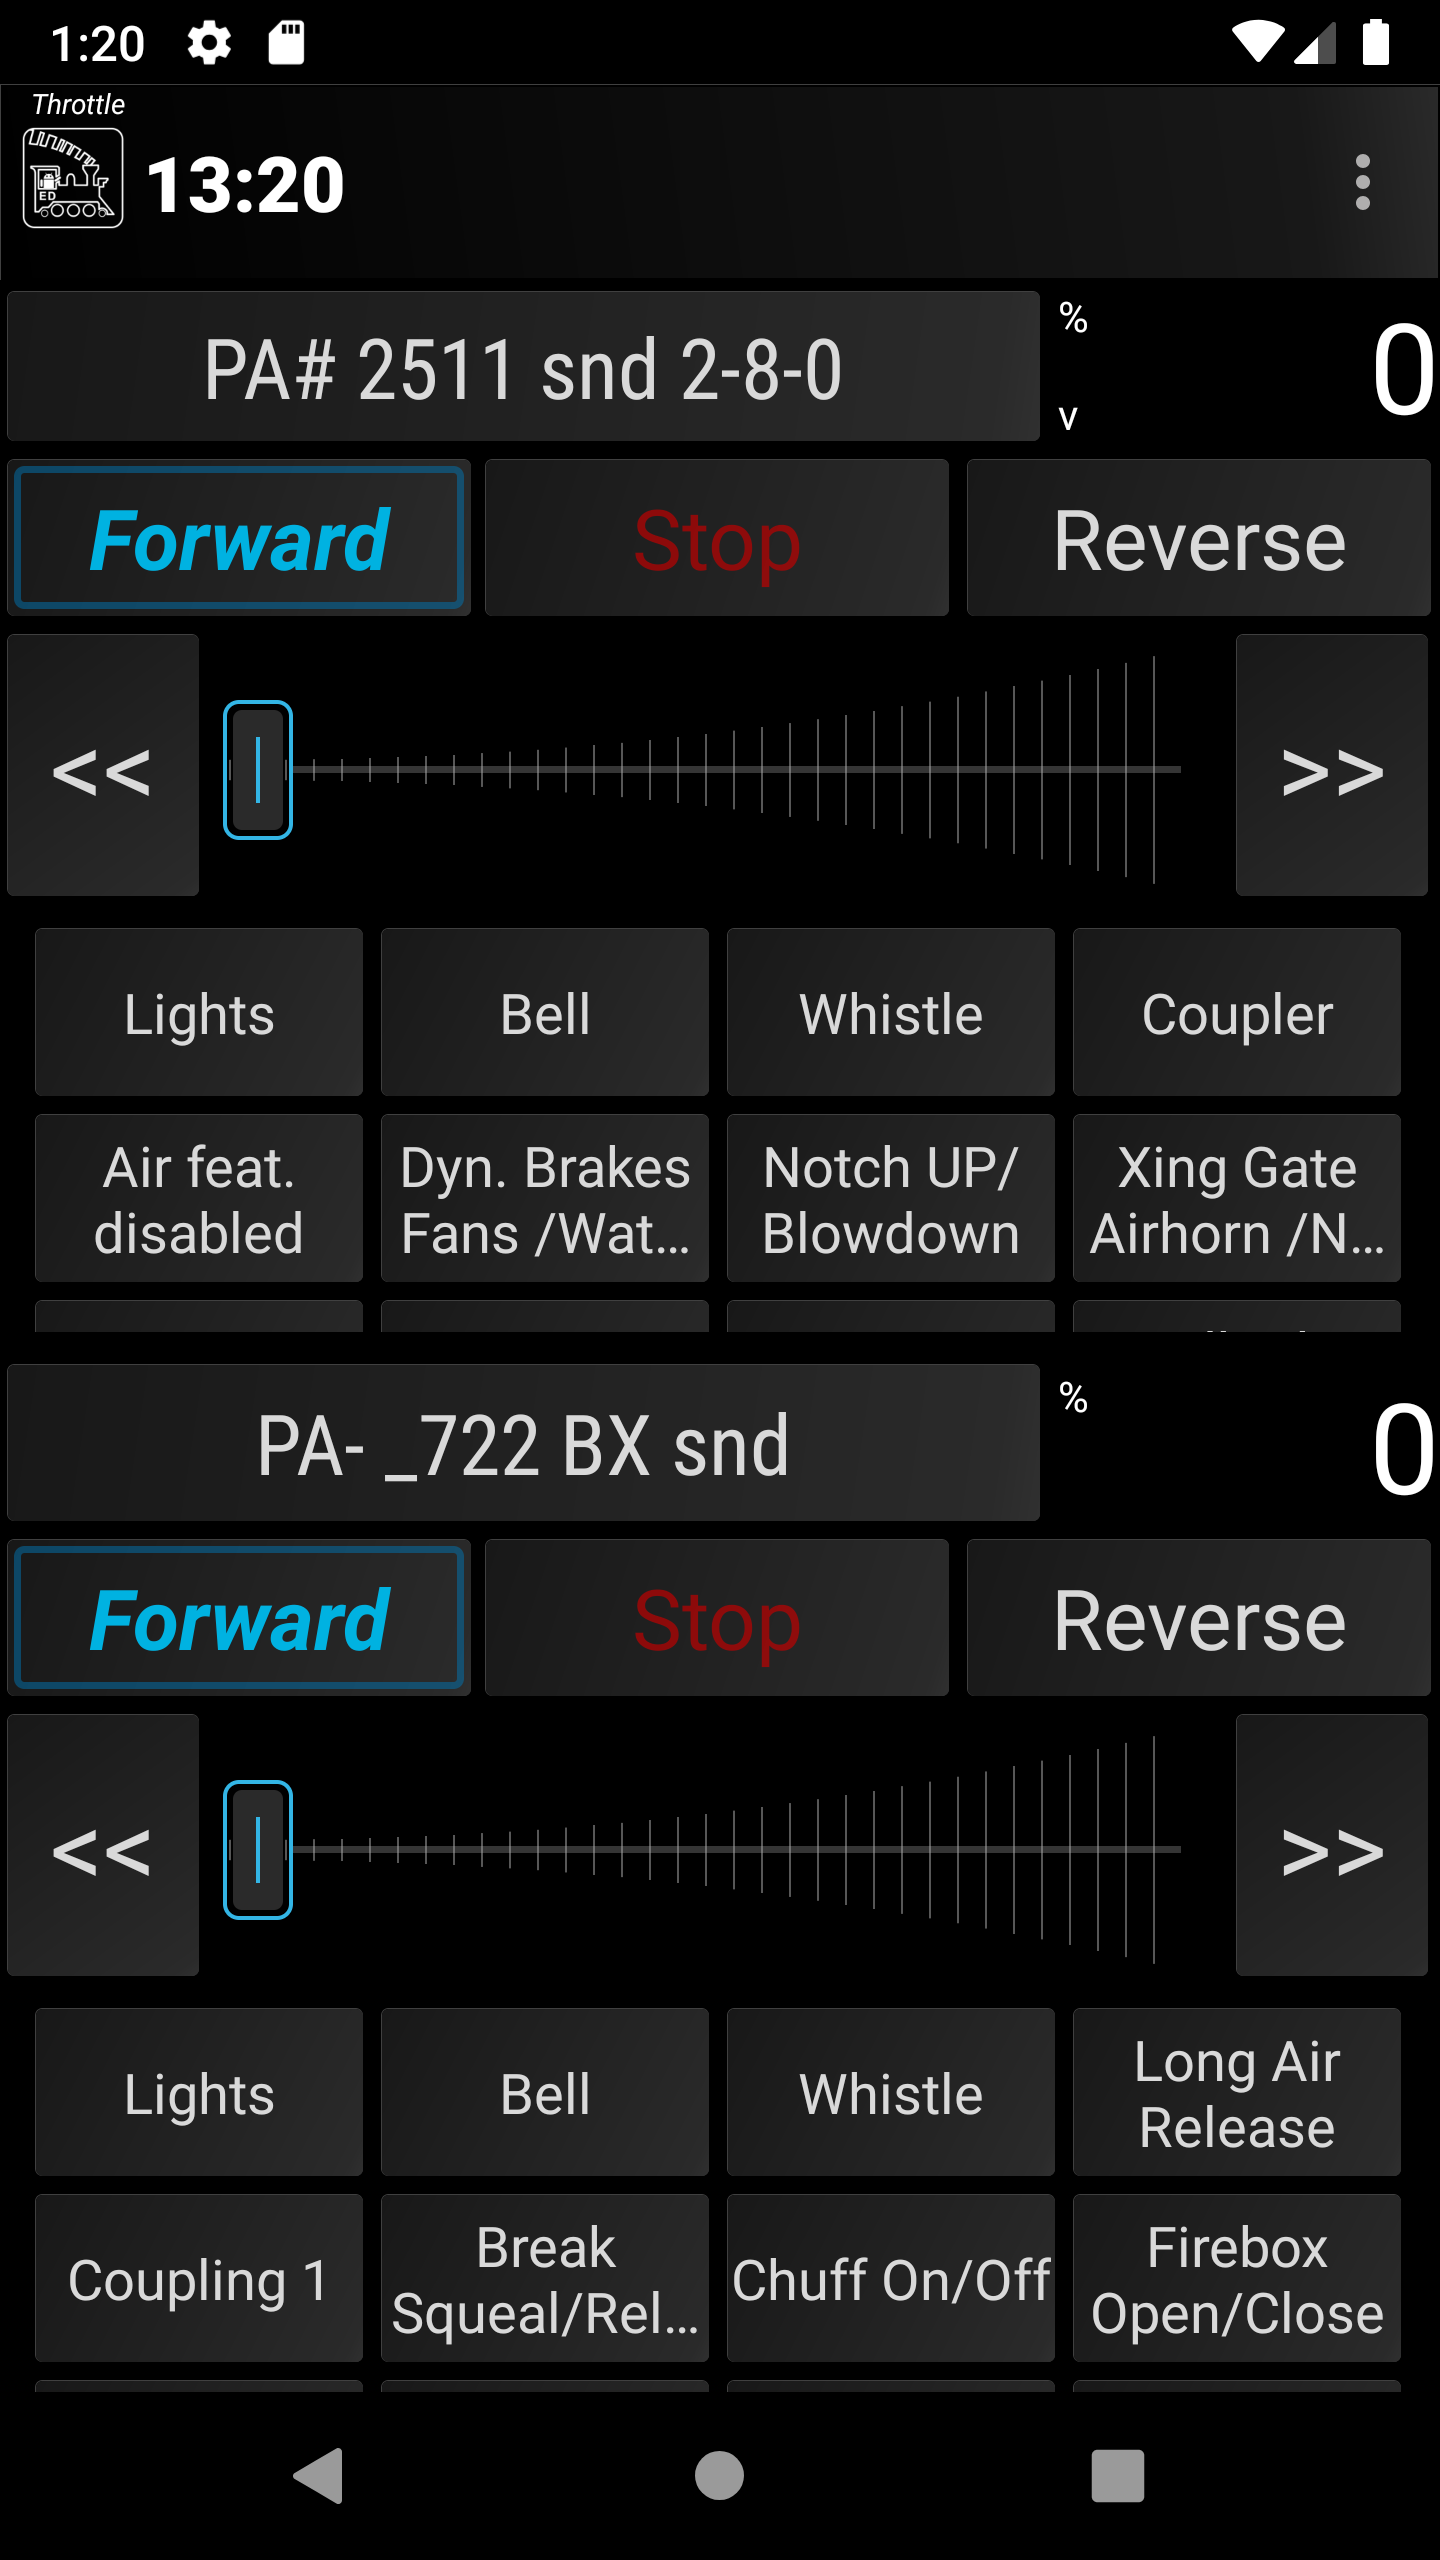
Theme / Styles
Themes provide different colours and textures to the buttons, backgrounds, sliders etc. for all the screens in Engine Driver. i.e. It changes the appearance of the entire app.
There are five themes to choose from:
Example |
Theme |
|---|---|
|
Original theme |
|
High contrast theme |
|
High contrast |
|
Dark theme |
|
Colourful theme |
Note
See the Theme / Style preference on the preferences page for more information.
Localisation
Changing the Localisation primarily changes the language used in the menus, buttons and messages throughout Engine Driver.
Supported localisations are:
Use Phone’s global setting
English (US) - Engine Driver’s default
English (UK)
English (AUS)
English (NZ)
Italian
Portuguese
German
Spanish
Catalan
French
Czech
Note
See the Localisation preference on the Preferences page for more information.
Action Bar
The Action Bar appears at the top of all screens. It will show different information and different buttons depending on a) the particular screen and b) preferences you have set.
The Action Bar can display:
The app name (Engine Driver)
Optionally configured information:
Fast Clock
Children’s Timer Status and Countdown
Full Screen or Action Bar Only left/right swipe
WiThrottle Server Name
Optionally configured buttons:
Emergency Stop (EStop)
Track Power
Flashlight
Throttle Web View
Throttle Layout Switching
In Phone Loco Sound
Children’s Timer
The optional buttons are enabled and configured via the corresponding preferences in the Throttle Screen Action Bar preference group. (Other than the Children’s Timer which is configured in the Children’s Timer preference group.)
Emergency Stop Button

The Emergency Stop Action Bar button is enabled with the Emergency Stop button? preference.
Clicking this button will attempt to quickly stop all locos controlled by the device / phone. Locos controlled by other people/devices are not stopped.
Track Power Button

The Track Power Action Bar button is enabled with the Layout Power button? preference.
Track Power, when pressed will turn on/off the power to the track. The colour of the button will change colour:
‘Amber’ = unknown state
‘Red’ = Power is Off
‘Green’ = Power is On
Flashlight Button

The Flashlight Action Bar button is enabled with the Flashlight button? preference.
Flashlight, when pressed will turn on/off the Device’s camera light.
The device / phone must have a camera to be able to use this feature.
Throttle Web View Button

The Throttle Web View Action Bar button is enabled with the Throttle Web View button? preference.
Throttle Web View, when pressed will show or hide the Throttle Web View panel on the Throttle Screen.
Note: the Throttle Web View? <../configuration/preferences.html#throttle-web-view> preference must be enabled for this to have an effect.
Layout Switch Button

Todo
Layout Switch Button
The Layout Switch Action Bar button is enabled with the Show Layout Switch button preference.
The Layout Switch buttons, when pressed …
In Phone Loco Sound Button
Todo
In Phone Loco Sound Button

The In Phone Loco Sounds Action Bar button is enabled with the In Phone sounbds Button preference.
In Phone Loco Sounds, when clicked …
Children’s Timer Button

The Children’s Timer Button Action Bar button is enabled with the Show Timer Button? preference.
The Children’s Timer Button, when pressed will activate the Timer for the preset time period.
Note
See the Children’s Timer section of the Advance Operation page for more information.
Fast Clock
Todo
Fast Clock
The Fast Clock Action Bar button is enabled with the Fast Clock Display preference.
Note
See JMRI’s Fast Clock page for information on how to set up a Fast Clock.
Children’s Timer Status and Countdown

Todo
Children’s Timer Status and Countdown
Note
See the Children’s Timer part of the Advance Operation page for more information.
Full Screen or Action Bar Only left/right swipe
Todo
Full Screen or Action Bar Only left/right swipe
WiThrottle Server Name

Todo
WiThrottle Server Name
Overflow Menu
The Overflow Menu (or simply ‘Menu’) appears in the Action Bar at the top of most of the main screens is normally three dots (⁞) or three bars (≡). It will show different options depending on a) the particular screen, b) preferences you have set and c) the state of certain elements in the app.
The Overflow Menu can display:
Throttle (All except the Throttle Screen only)
Turnouts/Points (All except the Turnout/Points Screen only)
Routes (All except the Routes Screen only)
Function Defaults (Throttle Screen only)
Gamepads (Throttle Screen only)
Loco Sounds (Throttle Screen only)